
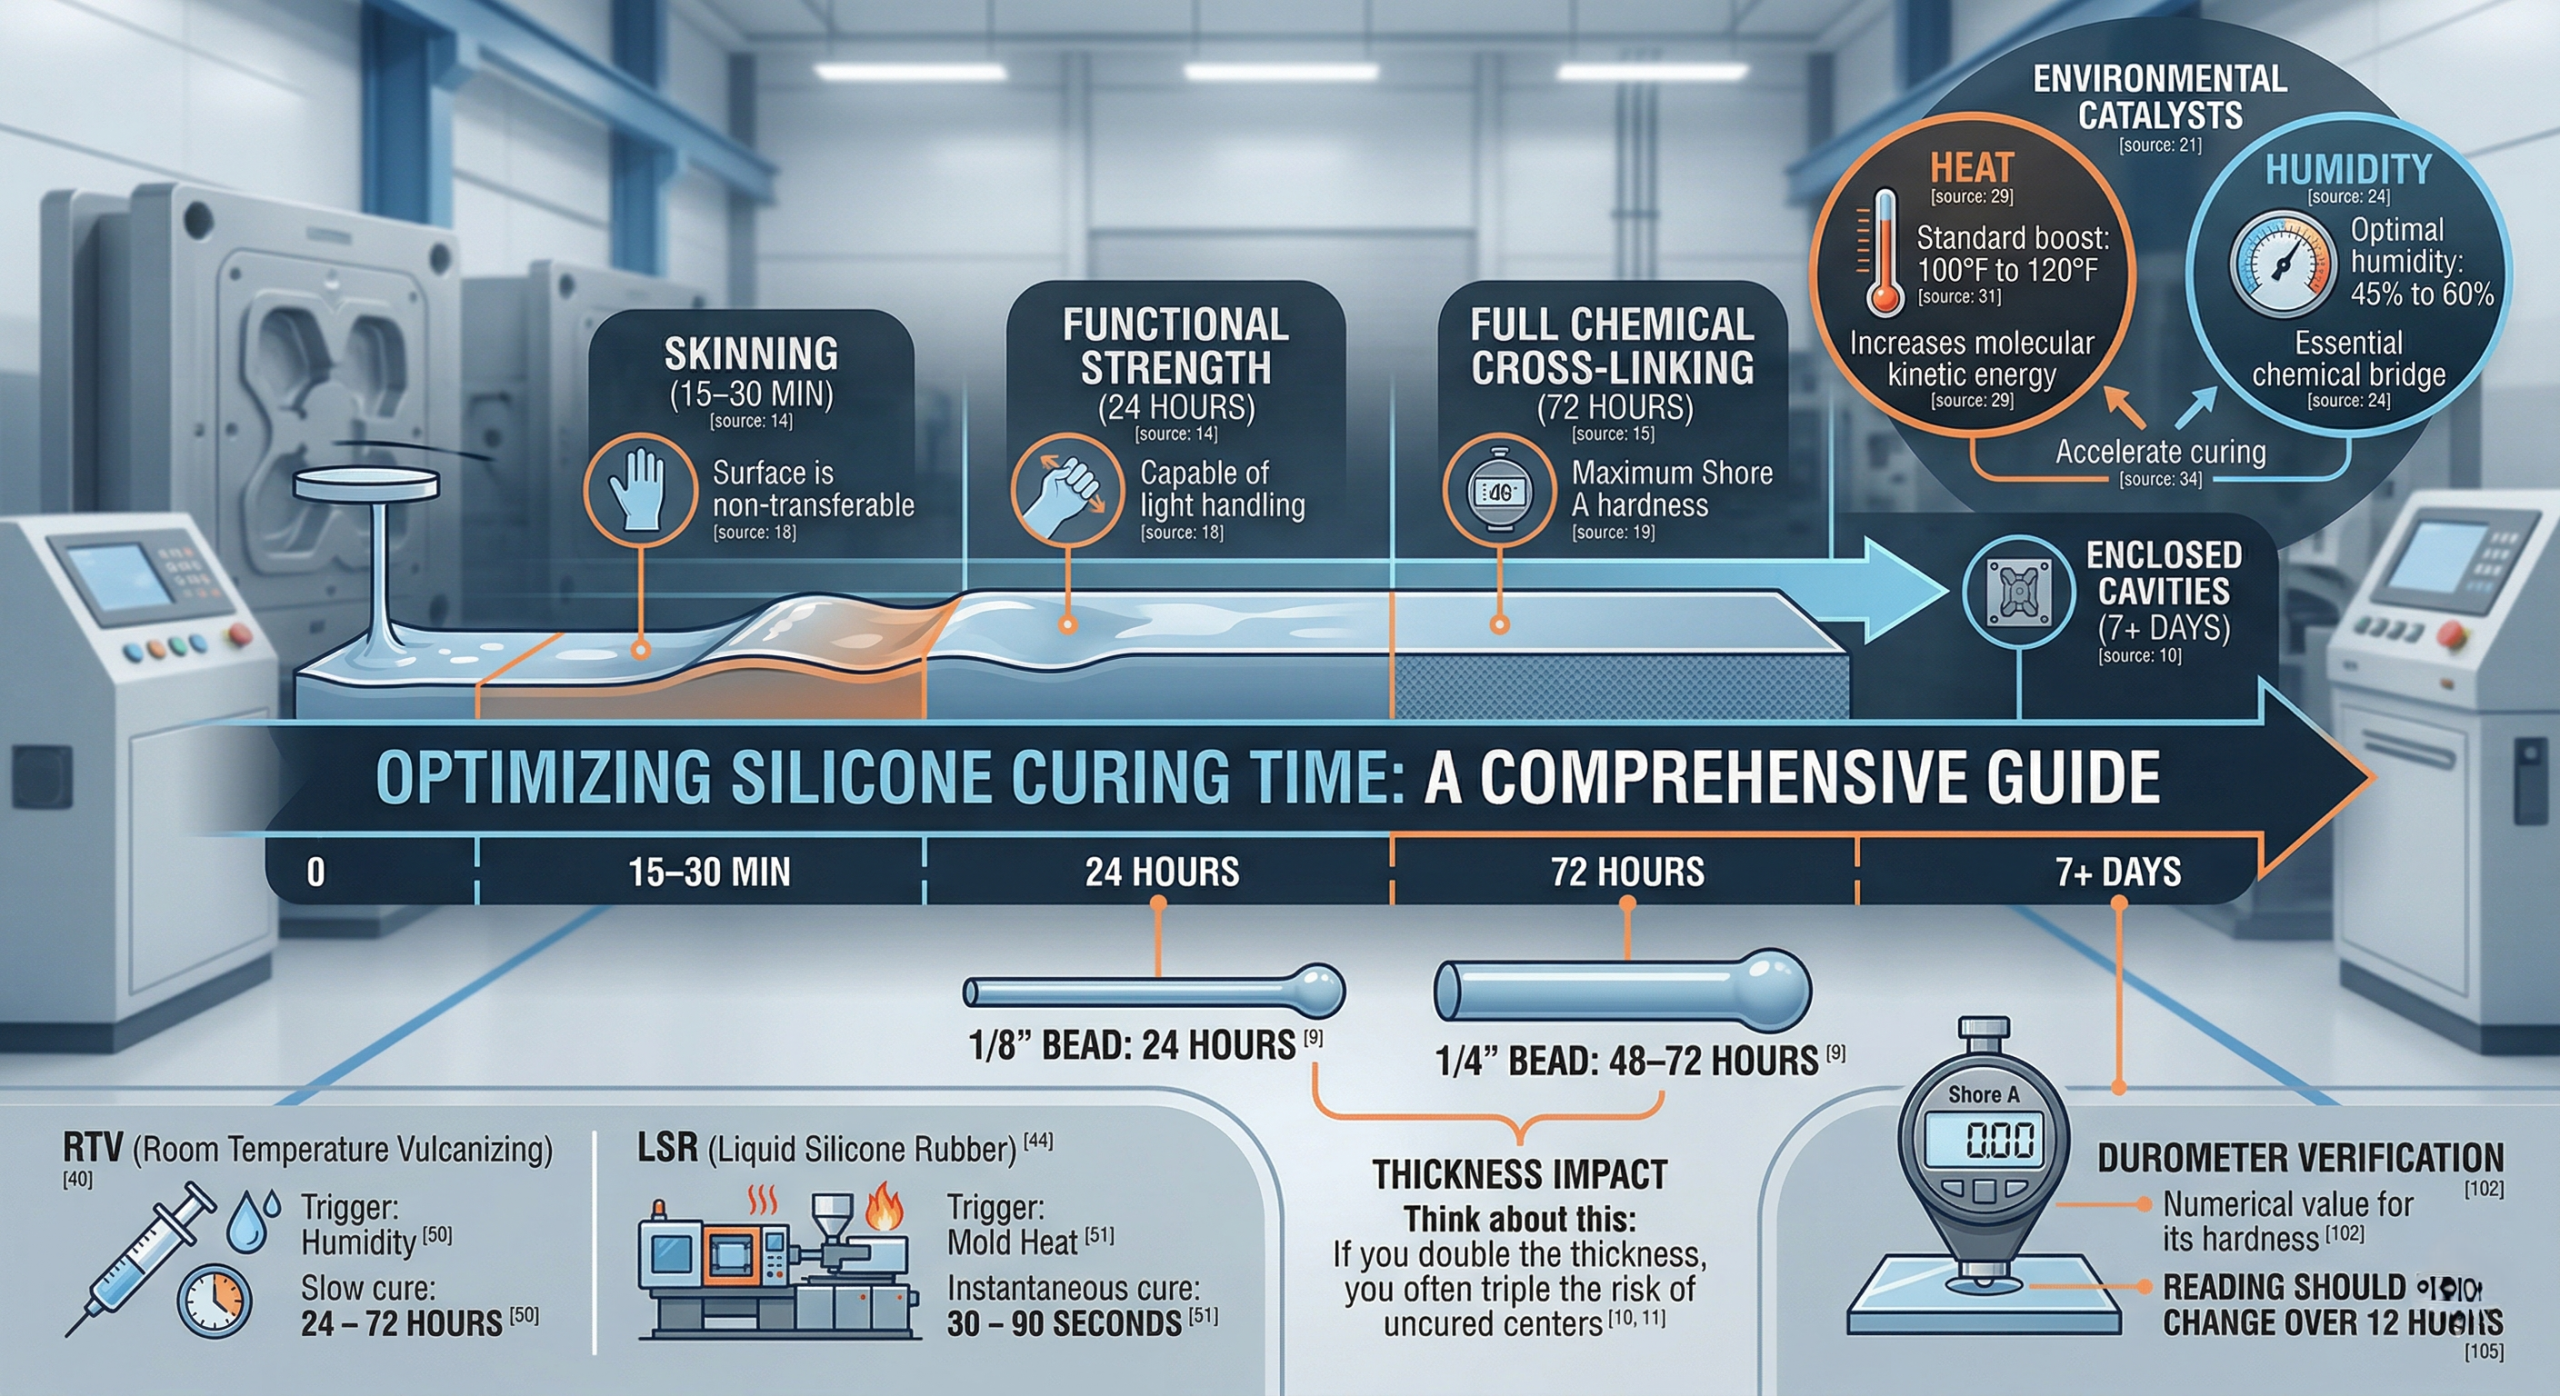
Generally, silicone takes 24 to 72 hours to cure fully for most standard applications, though surface skinning can occur in as little as 20 minutes. Waiting for a seal or component to stabilize can be a frustrating bottleneck in a fast-moving production cycle. If you rush the process, you risk structural failure, leaks, or material degradation that can compromise the integrity of your entire project. By understanding the variables behind curing—from material chemistry to environmental conditions—you can optimize your manufacturing timeline and ensure every Custom Silicone Mold produces a high-performance part.
What is the typical curing time for silicone?
Standard silicone formulations typically require 24 hours for every 1/8 inch of thickness to reach a functional state. When you are managing a project involving a Custom Silicone Mold, you must account for the specific material volume and geometry to avoid premature assembly.
Does thickness impact the schedule?
The depth of your material bead or part section is the primary determinant of how long you must wait. You will find that as thickness increases, the path for moisture or heat to reach the center becomes significantly restricted.
- 1/8″ bead: 24 hours.
- 1/4″ bead: 48 to 72 hours.
- Enclosed cavities: 7+ days.
Think about this:
If you double the thickness, you don’t just double the time; you often triple the risk of uncured centers.
When can you handle the part?
Initial handling is often possible once the surface is tack-free, but you should wait for a full structural cure for mechanical testing. You can use visual indicators to monitor progress, though these do not replace professional durometer testing.
- Skin-over: 15–30 minutes.
- Functional strength: 24 hours.
- Full chemical cross-linking: 72 hours.
The truth is:
Handling a part too early can leave permanent fingerprints or cause internal delamination that compromises the seal.
Key Takeaway: Always allow at least 24 hours for every 3mm of thickness before subjecting your silicone parts to any mechanical stress or pressure testing.
| Cure Phase | Timeframe | Physical Property |
|---|---|---|
| Skinning | 20 Mins | Surface is non-transferable |
| Functional | 24 Hours | Capable of light handling |
| Full Cure | 72 Hours | Maximum Shore A hardness achieved |
The data confirms that while surface stability is reached quickly, the internal chemical bonds require a multi-day window for complete maturation.
Which environmental factors speed up silicone curing?
Elevated temperature and humidity levels are the most effective environmental catalysts for accelerating the curing of standard RTV silicones. When you utilize a Custom Silicone Mold, maintaining a controlled environment ensures that the material cures uniformly without internal voids or surface cracking.
How do humidity levels play a role?
For condensation-cure silicones, moisture in the air is the essential chemical bridge that links the polymer chains together. You will notice that in very arid climates, the curing process can stall completely, leading to a tacky surface that never fully solidifies.
- Optimal humidity: 45% to 60%.
- Arid risk: Brittle surfaces.
- High humidity risk: Premature skinning trapping air.
Here is the deal:
If you are manufacturing in a dry facility, adding a humidifier can reduce your production lead time by up to 30%.
Can heat accelerate the process?
Applying moderate heat increases the kinetic energy of the molecules, allowing the chemical reaction to proceed at a much faster rate. However, you must be careful not to exceed the material’s thermal limits during the initial phase to prevent bubbling or warping.
- Standard boost: 100°F to 120°F.
- Addition-cure: Responds best to heat.
- Condensation-cure: Heat can sometimes trap moisture out.
But that’s not all:
Uniform heat distribution is critical; cold spots in your curing chamber will lead to inconsistent hardness across your batch.
Key Takeaway: Maintain a balance of 50% relative humidity and slightly elevated temperatures to ensure your silicone parts cure deeply and consistently.
| Environment | Humidity | Effect on Cure Time |
|---|---|---|
| Desert/Dry | <20% | 50% slower |
| Controlled Lab | 50% | Baseline standard |
| Tropical | >75% | 20% faster |
The analysis shows that humidity is the dominant factor for RTV systems, making environmental control a mandatory requirement for high-precision manufacturing.
How do different silicone types affect cure speed?
The chemistry of the material—whether it is RTV, HTV, or LSR—dictates the fundamental physics of its curing timeline. When selecting a Custom Silicone Mold for your application, you must match the curing method to your desired throughput and production volume.
What makes RTV silicone different?
Room Temperature Vulcanizing (RTV) silicone is designed to cure at ambient temperatures, making it highly convenient for prototyping and small-batch production. You will find that these materials are typically moisture-dependent and require more time than heat-cured alternatives.
- 1-Part RTV: Simple application, slow cure.
- 2-Part RTV: Chemical catalyst speed, faster cure.
- Pot life: 30 to 60 minutes.
Think about this:
RTV is the “set it and forget it” solution, but it is rarely the right choice for high-volume automated assembly lines.
Why does LSR cure so fast?
Liquid Silicone Rubber (LSR) is engineered for high-speed injection molding, where the curing reaction is triggered by high-pressure heat within seconds. You can produce thousands of parts per day because the platinum-catalyzed reaction is nearly instantaneous once the material enters the heated cavity.
- Cure time: 30 to 90 seconds.
- Efficiency: High automation.
- Consistency: Extremely tight tolerances.
Here is the kicker:
LSR technology allows you to move from raw liquid to a packaged part in less time than it takes to brew a cup of coffee.
Key Takeaway: Choose LSR for high-volume manufacturing to reduce cure times from hours to seconds, provided your project budget allows for heated steel tooling.
| Silicone Type | Trigger | Typical Full Cure |
|---|---|---|
| RTV | Humidity | 24 – 72 Hours |
| HTV | High Heat | 2 – 4 Hours |
| LSR | Mold Heat | 30 – 90 Seconds |
This comparison highlights that LSR is the superior choice for B2B applications requiring rapid turnaround and high dimensional stability.
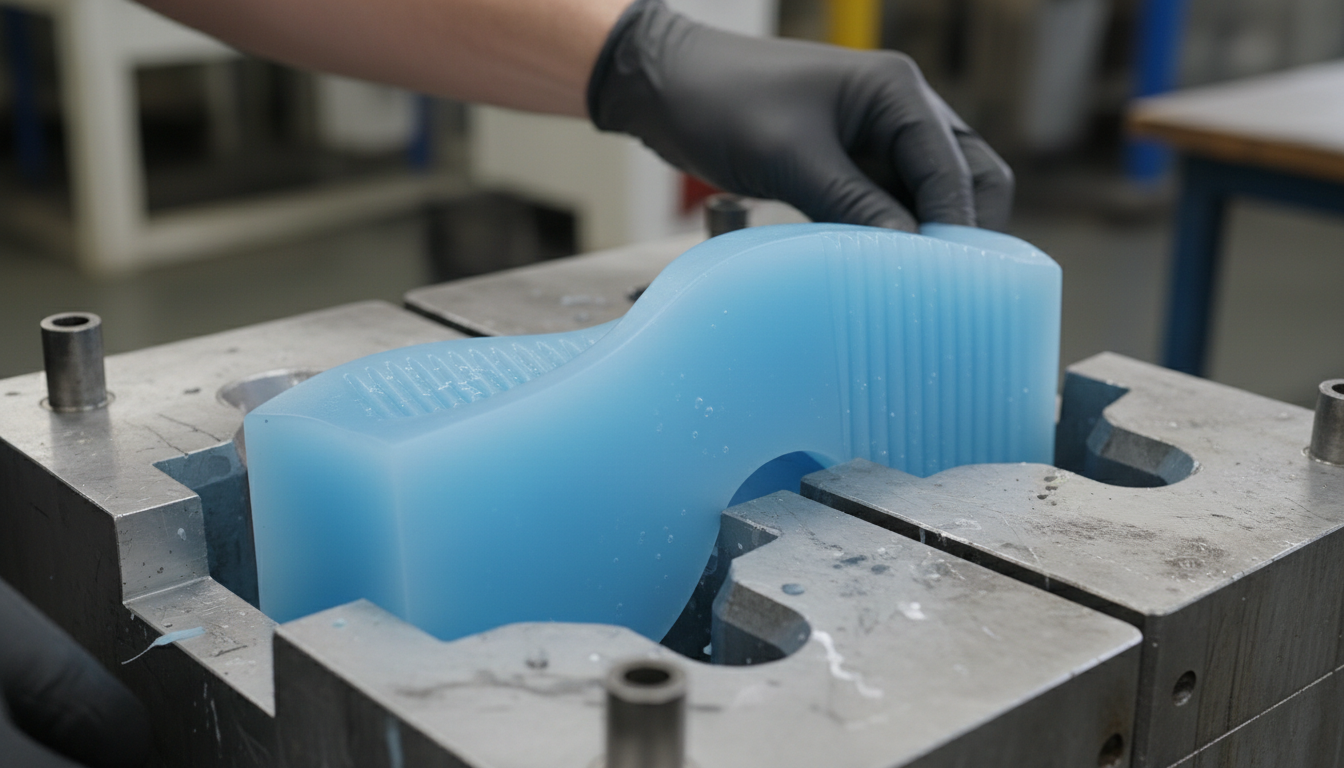
Why does application thickness change the timeline?
Silicone cures from the outside in, meaning the outer layer forms a barrier that slows the penetration of curing agents to the core. When you design a Custom Silicone Mold, you must account for the fact that a thicker cross-section creates an exponential increase in the required cure time.
Is oxygen penetration a factor?
While some silicones need moisture, others require the absence of air or the presence of specific catalysts that must travel through the cured skin. You will find that the thicker the “skin” becomes, the harder it is for the internal chemistry to complete its transformation.
- Skin density: High density slows moisture.
- Surface area: More exposure equals faster cure.
- Diffusion: The primary bottleneck.
The truth is:
Large surface areas cure much faster than narrow, deep channels even if they contain the same volume of material.
How do deep sections solidify?
In deep sections, the internal material remains liquid long after the surface feels firm, which can lead to “blowouts” if the part is pressurized. You should consider tiered layering or specialized two-part silicones if your part design exceeds standard thickness thresholds.
- Max depth per layer: 1/4 inch.
- 2-Part advantage: Uniform internal cure.
- Void risk: Trapped air prevents curing.
But wait, there’s more:
Deep-section curing issues are the number one cause of internal cracks that lead to seal failures months after the part is deployed.
Key Takeaway: If your design requires a thickness of more than 10mm, you must switch from a moisture-cure system to a 2-part chemical cure to ensure internal integrity.
| Thickness | Cure Duration | Risk Level |
|---|---|---|
| 3mm | 24 Hours | Low |
| 6mm | 48 Hours | Medium |
| 12mm+ | 7+ Days | High |
This analysis underscores the non-linear relationship between depth and time, emphasizing the need for 2-part systems in thick-walled B2B components.
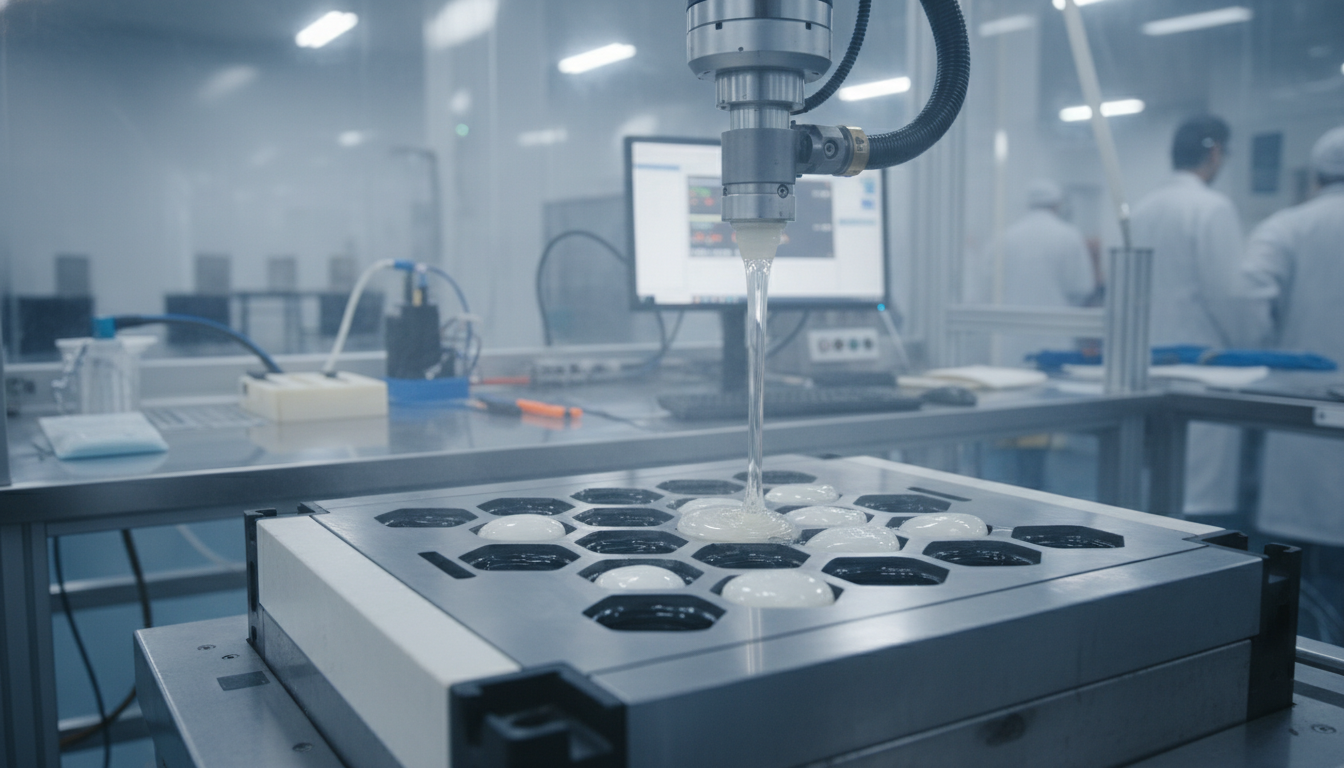
Can you safely accelerate the silicone curing process?
Accelerating the cure is possible through controlled thermal energy or chemical additives, but it requires a careful balance to avoid material defects. When you partner with us for a Custom Silicone Mold, we optimize these parameters to ensure your parts meet the highest quality standards without unnecessary delays.
Should you use industrial ovens?
Using industrial ovens to provide steady heat is the most common way to slash curing times for addition-cure silicones. You will observe that a part that takes 24 hours at room temperature can often be fully cured in just 2 hours at 150°F.
- Post-curing: Removes volatiles.
- Stability: Reduces shrinkage.
- Precision: Uniform thermal soak.
Make no mistake:
Using a standard kitchen oven or heat gun is dangerous and results in uneven curing that will ruin your tooling.
Do chemical catalysts work?
Adding more catalyst to a two-part system can trigger a faster reaction, but it also drastically reduces the “pot life” or working time you have to pour the material. You must ensure your mixing and pouring equipment is fast enough to handle the accelerated reaction before the material gels.
- Pot life: Reduces from 60 to 10 mins.
- Brittleness: Excessive catalyst risk.
- Color shift: Potential yellowing.
But that’s not all:
A “fast cure” catalyst is excellent for rapid prototyping but can lead to air entrapment if the material thickens too quickly for bubbles to escape.
Key Takeaway: Thermal acceleration is safer and more consistent than over-catalyzing; always use calibrated ovens for your B2B silicone production needs.
| Acceleration Method | Speed Gain | Primary Risk |
|---|---|---|
| Heated Ovens | 80% Faster | Thermal warping |
| High Humidity | 30% Faster | Surface tearing |
| Extra Catalyst | 90% Faster | Air entrapment |
The table illustrates that while chemical catalysts are the fastest, they carry the highest risk for part quality and process control.
What are the risks of using silicone before it is cured?
Using uncured or partially cured silicone leads to catastrophic failure in both bond strength and mechanical performance. When you specify a Custom Silicone Mold, you are investing in precision, and rushing the curing stage effectively negates the benefits of high-quality engineering.
Does mechanical integrity suffer?
The polymer chains in uncured silicone have not yet fully linked, meaning the material will rip or permanently deform under very light loads. You will find that parts handled prematurely may look fine on the surface but will fail immediately when subjected to real-world vibration or pressure.
- Tear strength: Reduced by 70%.
- Hardness: Remains too soft.
- Elasticity: High risk of “set” or deformation.
Here is the deal:
A part that is “almost cured” is effectively 0% functional for industrial high-pressure applications.
Is chemical outgassing a concern?
Uncured silicone continues to release chemical byproducts—such as acetic acid or alcohol—which can damage sensitive electronic components or irritate human skin. You must ensure the curing process is 100% complete before integrating silicone seals into enclosed electronics or medical assemblies.
- Electronic corrosion: Caused by acidic fumes.
- Biocompatibility: Residual monomers are toxic.
- Odor: Strong chemical smell persists.
Think about this:
Outgassing from uncured silicone is a silent killer in the telecommunications industry, often corroding delicate copper traces within weeks.
Key Takeaway: Never integrate a silicone component into an assembly until it has passed the 72-hour mark or undergone a certified post-cure cycle to ensure zero outgassing.
| Handling Stage | Reliability | Recommended Action |
|---|---|---|
| <12 Hours | 0% | Do not touch; leave in mold |
| 24 Hours | 50% | Safe for light transport only |
| 72 Hours | 100% | Full industrial deployment |
This summary highlights that mechanical reliability is a late-stage development in the curing cycle, requiring patience to avoid batch rejection.
How do you verify if silicone is fully cured?
Verification involves more than just a visual check; it requires empirical testing to ensure the material has reached its specified properties. When you receive parts from a Custom Silicone Mold, checking the hardness and surface tack is the first step in quality assurance.
Can you use a durometer?
A Shore A durometer is the industry-standard tool for measuring the resistance of silicone to indentation, providing a numerical value for its hardness. You should compare your readings against the material’s technical datasheet; if the reading is lower than specified, the part is likely uncured.
- Tool: Shore A Durometer.
- Procedure: Press into a flat surface.
- Stability: Reading should not change over 12 hours.
But wait, there’s more:
Taking multiple readings across the part’s surface can help you identify “soft spots” caused by poor mixing or uneven humidity.
What is the tack-free test?
The tack-free test is a simple but effective way to determine if the surface has “skinned” enough to prevent debris from sticking. You can perform this by lightly touching the silicone with a clean tool; if the material does not transfer or feel sticky, it has reached the tack-free stage.
- Tool: Wooden stick or gloved finger.
- Indicator: No residue transfer.
- Limit: Does not indicate internal cure.
Here is the kicker:
A tack-free surface is often misleading; you can have a “dry” exterior and a completely liquid core in thick applications.
Key Takeaway: Use a durometer to verify structural hardness; never rely solely on a touch test for critical B2B sealing components.
| Test Method | Accuracy | What it Measures |
|---|---|---|
| Touch Test | Low | Surface skinning |
| Durometer | High | Cross-linking density |
| Compression Set | Highest | Molecular stability |
This analysis confirms that professional-grade tools are necessary to validate that your silicone parts are ready for high-performance industrial use.
Does medical-grade silicone require special curing?
Medical-grade silicones must meet extreme purity standards, often requiring extended post-curing cycles in cleanroom environments. When you order Custom Silicone Mold services for healthcare, the curing process is focused as much on biocompatibility as it is on mechanical strength.

Is post-curing necessary for safety?
Post-curing involves placing the parts in a high-temperature oven for several hours after they have demolded to bake out any residual low-molecular-weight siloxanes. You will find that this step is mandatory for parts that will have long-term contact with human skin or tissue to ensure they are non-reactive.
- Duration: 2 to 4 hours.
- Temp: 350°F to 400°F.
- Goal: Degassing and sterilization.
The truth is:
Skipping the post-cure for medical parts can lead to FDA compliance failures and hazardous reactions in end-users.
How do cleanrooms ensure consistency?
In a Class 100,000 cleanroom, the temperature and humidity are tightly regulated, removing the environmental variables that plague standard factory floors. You can expect perfectly repeatable curing times, which is essential for medical manufacturers who must validate every step of their process.
- ISO 13485: Quality standard.
- Particle control: Prevents inclusions.
- Traceability: Batch-specific cure logs.
But that’s not all:
Controlled cleanroom environments are the only way to guarantee that your silicone keypads or seals are free from microscopic contaminants that could compromise sterility.
Key Takeaway: Medical and food-grade applications should always include a documented post-cure phase to ensure the removal of all bio-harmful volatiles.
| Grade | Environment | Primary Cure Focus |
|---|---|---|
| Industrial | Open Factory | Speed and Adhesion |
| Food Grade | Controlled | Odor and Purity |
| Medical | Cleanroom | Biocompatibility |
The data emphasizes that medical-grade curing is a more rigorous, multi-stage process designed to prioritize user safety over simple manufacturing speed.
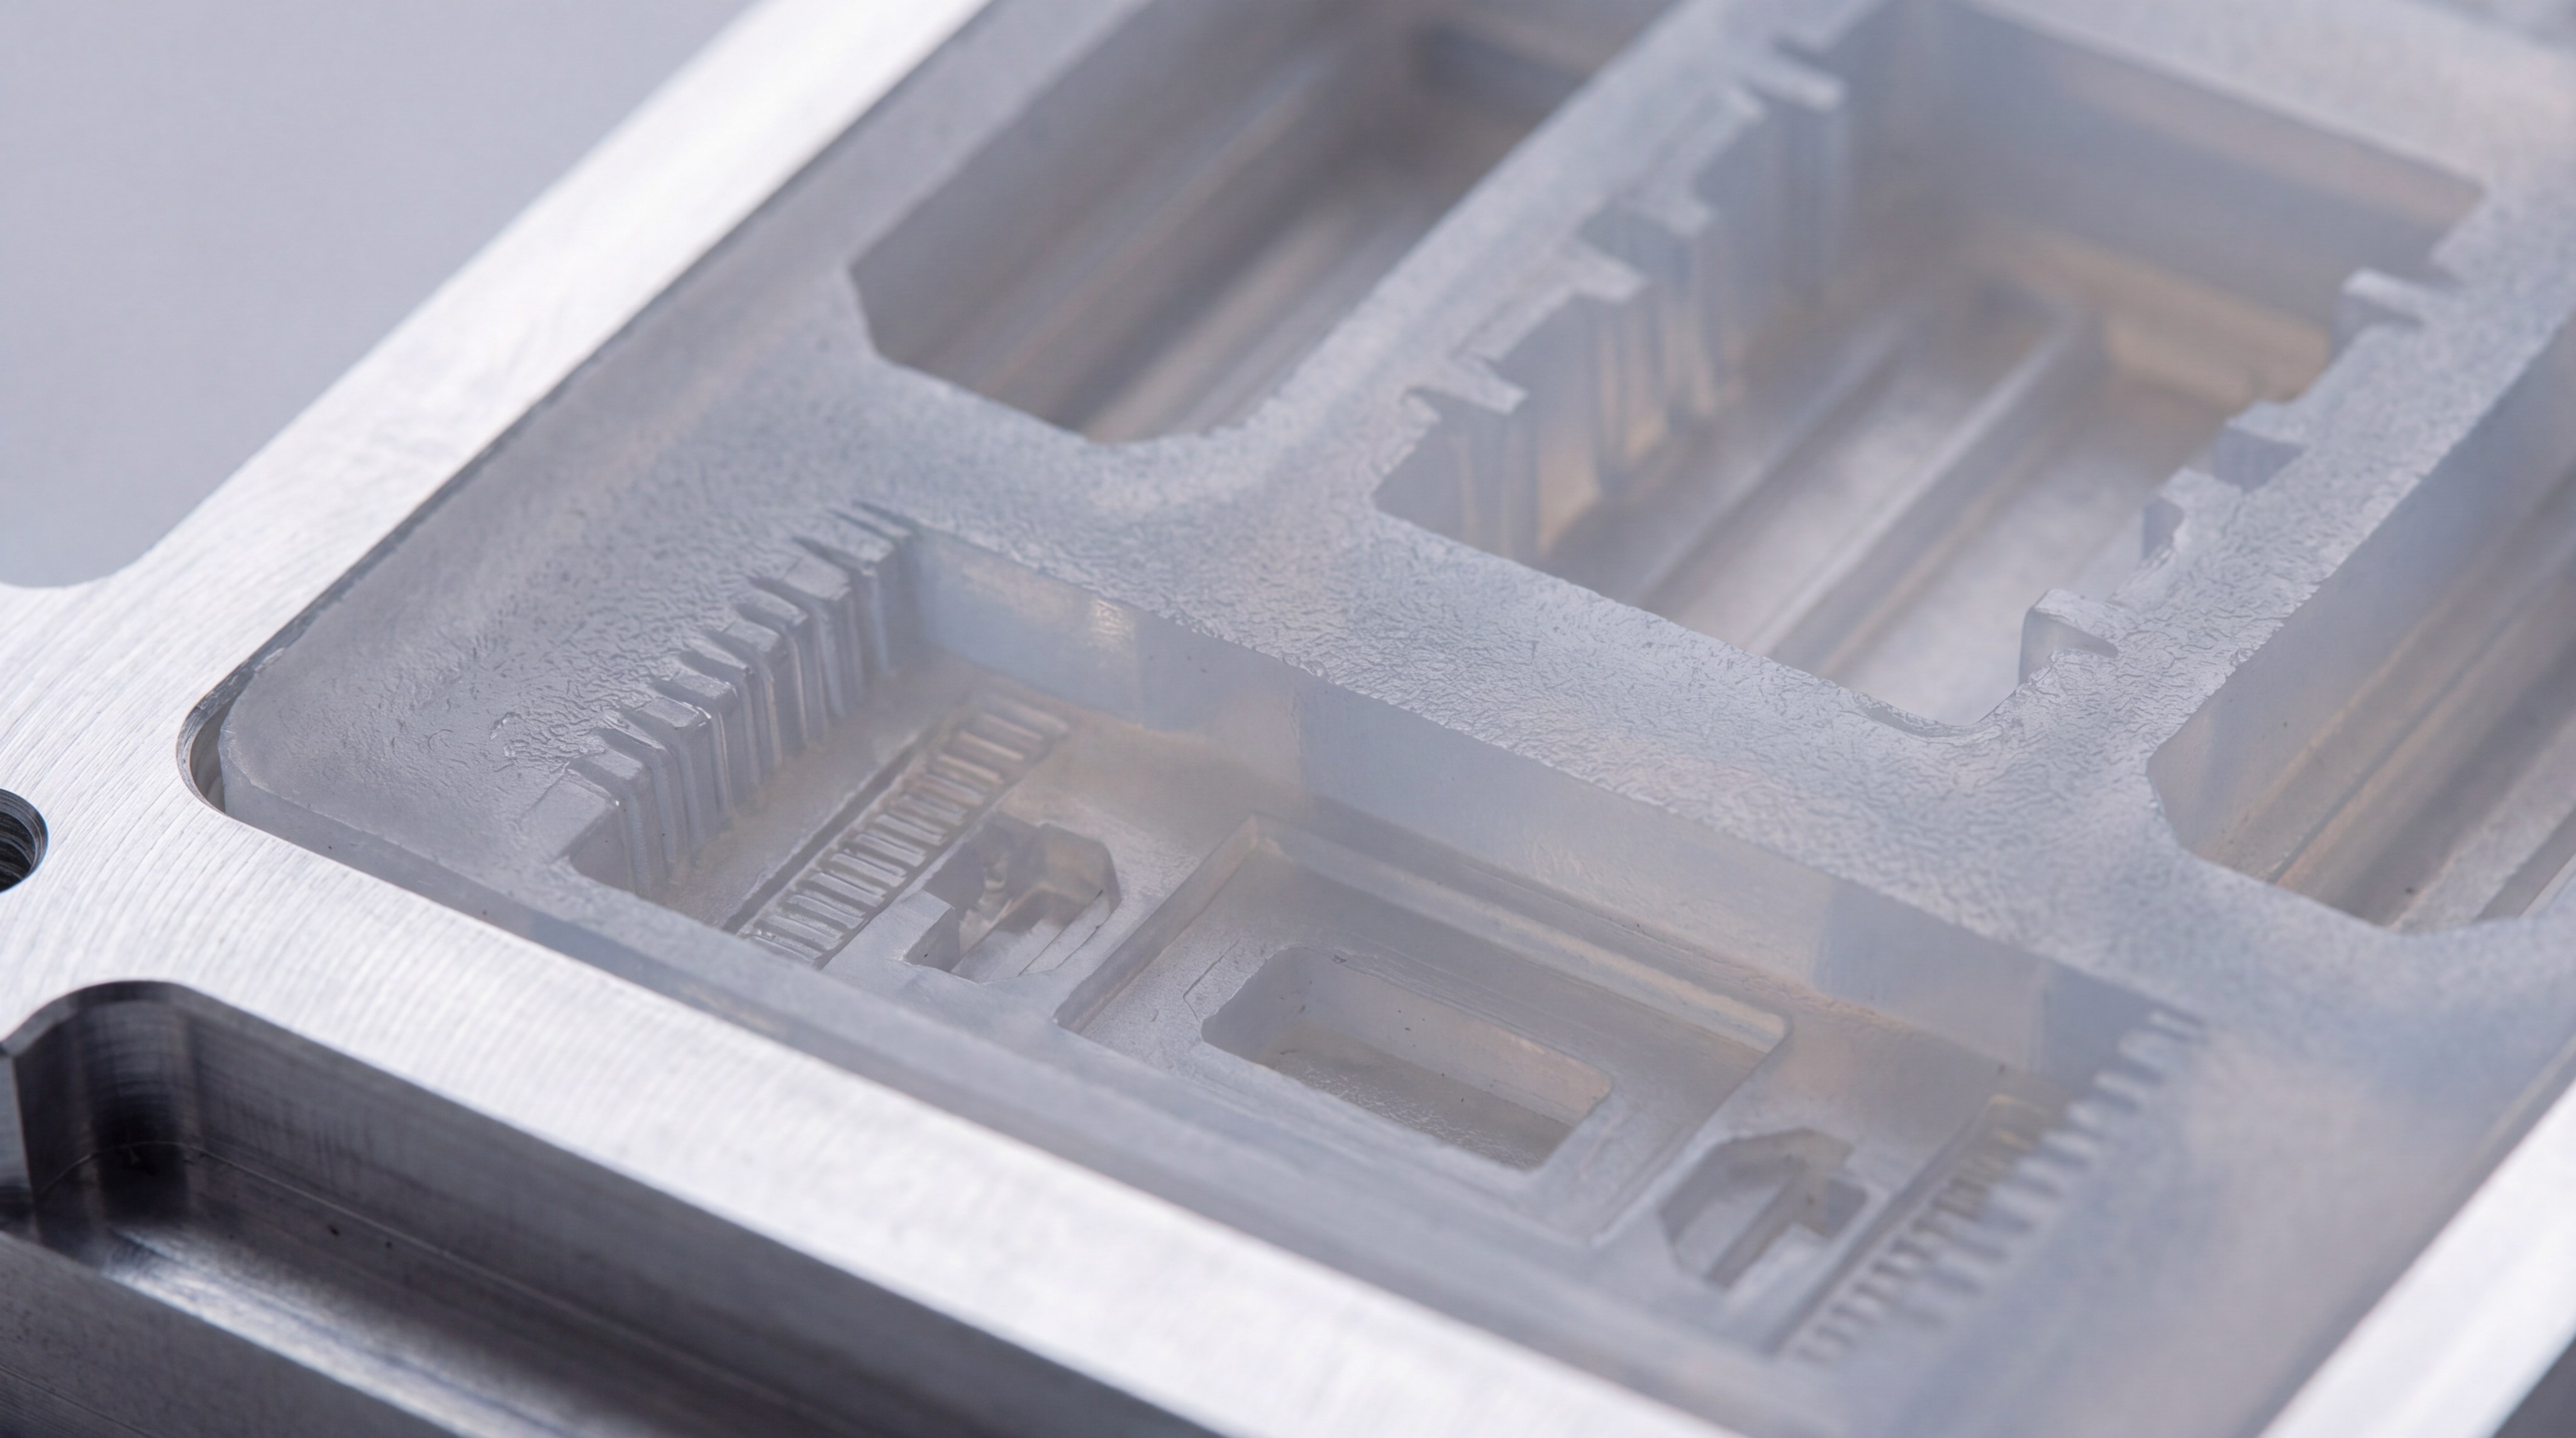
How does mold design influence the curing cycle?
The physical design of your mold directly impacts how heat and moisture interact with the silicone material. When you commission a Custom Silicone Mold, engineering features like venting and thermal channels can significantly reduce your per-part cycle time.
Does thermal conductivity matter?
Molds made from materials with high thermal conductivity, such as aluminum or specific steel alloys, allow heat to reach the silicone more efficiently. You will find that a well-engineered mold distributes heat evenly, preventing the “hot spots” that cause localized over-curing and brittleness.
- Steel: High durability, medium heat transfer.
- Aluminum: Fast heat transfer, lower durability.
- Uniformity: Critical for part consistency.
Here is the deal:
Investing in better mold materials can pay for itself in weeks by shaving 10 seconds off every single molding cycle.
Can venting improve cure rates?
Proper venting allows air and moisture to circulate around the part, while also providing an escape path for the gases released during the vulcanization process. You should ensure your mold design includes strategically placed vents to prevent “air traps” that leave sections of your part soft and uncured.
- Vent placement: At the furthest flow points.
- Moisture entry: Critical for RTV molds.
- Gas release: Prevents internal bubbling.
Think about this:
Poorly vented molds are the primary cause of “sunk” features and surface pitting in high-precision silicone manufacturing.
Key Takeaway: Work with a manufacturer who provides DFM (Design for Manufacturability) reviews to ensure your mold design is optimized for thermal efficiency and proper venting.
| Mold Feature | Impact on Cure | Benefit |
|---|---|---|
| Thermal Channels | Very High | Faster HTV/LSR cycles |
| Precision Venting | High | Zero gas voids |
| Surface Texture | Medium | Easier demolding |
This analysis confirms that the mold is not just a container; it is an active component of the chemical curing process that determines your overall production efficiency.
What is the best way to store silicone materials?
Proper storage is critical to maintaining the material’s shelf life and ensuring that it cures as expected when finally used. When you manage inventory for your Custom Silicone Mold projects, you must protect your raw silicone from the very elements—heat and moisture—that trigger its curing.
Does moisture contamination occur?
If a container of 1-part RTV silicone is not perfectly sealed, atmospheric moisture will begin the curing process inside the tube or bucket. You will find that even a small amount of exposure can cause “gelation,” where the material becomes too thick to pour or inject correctly.
- Seal integrity: Use airtight containers.
- Nitrogen purging: Removes air from head space.
- Dry storage: Keep in low-humidity areas.
But wait, there’s more:
Once a container is opened, its shelf life drops from months to just days unless you use specialized desiccant caps or vacuum sealing.
How does shelf life affect curing?
As silicone material ages, the catalysts can lose their potency, leading to parts that take twice as long to cure or never reach their full hardness. You should always implement a First-In-First-Out (FIFO) inventory system and strictly adhere to the manufacturer’s expiration dates to avoid batch failures.
- FIFO: Use oldest stock first.
- Expiration: Never use past date for B2B.
- Temperature: Store below 80°F (27°C).
Make no mistake:
Using expired silicone is a high-risk gamble that usually ends in “no-cure” scenarios that require expensive mold cleaning and production downtime.
Key Takeaway: Store all raw silicone in a climate-controlled environment below 25°C and ensure containers are purged with dry air or nitrogen after every use.
| Storage Issue | Resulting Defect | Prevention |
|---|---|---|
| Heat Exposure | Premature Gelling | Refrigerated storage |
| Moisture Leaks | Cured Nozzles | Airtight sealing |
| Expired Stock | Tacky Surface | FIFO Inventory |
The summary proves that storage is a vital part of the quality chain, ensuring that the material you pour today performs exactly like the material you poured yesterday.
*
At the heart of every successful silicone project is a commitment to material precision and controlled manufacturing. Whether you are developing a complex industrial seal or a consumer wearable, understanding the nuances of curing is essential for long-term reliability. We specialize in controlled manufacturing processes that take the guesswork out of production timelines. Please contact us today to discuss how our expertise in LSR and compression molding can streamline your next project.
FAQ
Can I speed up silicone curing with a hairdryer?
No, you should never use a hairdryer for RTV silicone because it dries out the surface too quickly and prevents moisture from reaching the core, leading to a weak and brittle cure.
What is the best temperature for curing HTV silicone?
The best temperature range is between 150°C and 200°C (300°F – 390°F) for 2 to 4 hours, followed by a post-cure phase to ensure maximum stability.
How do I know if my silicone has “inhibited” and won’t cure?
You know it has inhibited if the material remains liquid or tacky long after the 72-hour mark, usually caused by contact with sulfur, latex, or specific adhesives.
Can I paint silicone once it is fully cured?
Standard silicone is not paintable because nothing sticks to it; however, you can use specialized silicone-based inks or choose a “paintable” hybrid sealant if required.
Will silicone cure faster in the freezer?
No, cold temperatures actually slow down or halt the chemical reaction, which is why some professionals use freezers to extend the pot life of mixed silicone.