
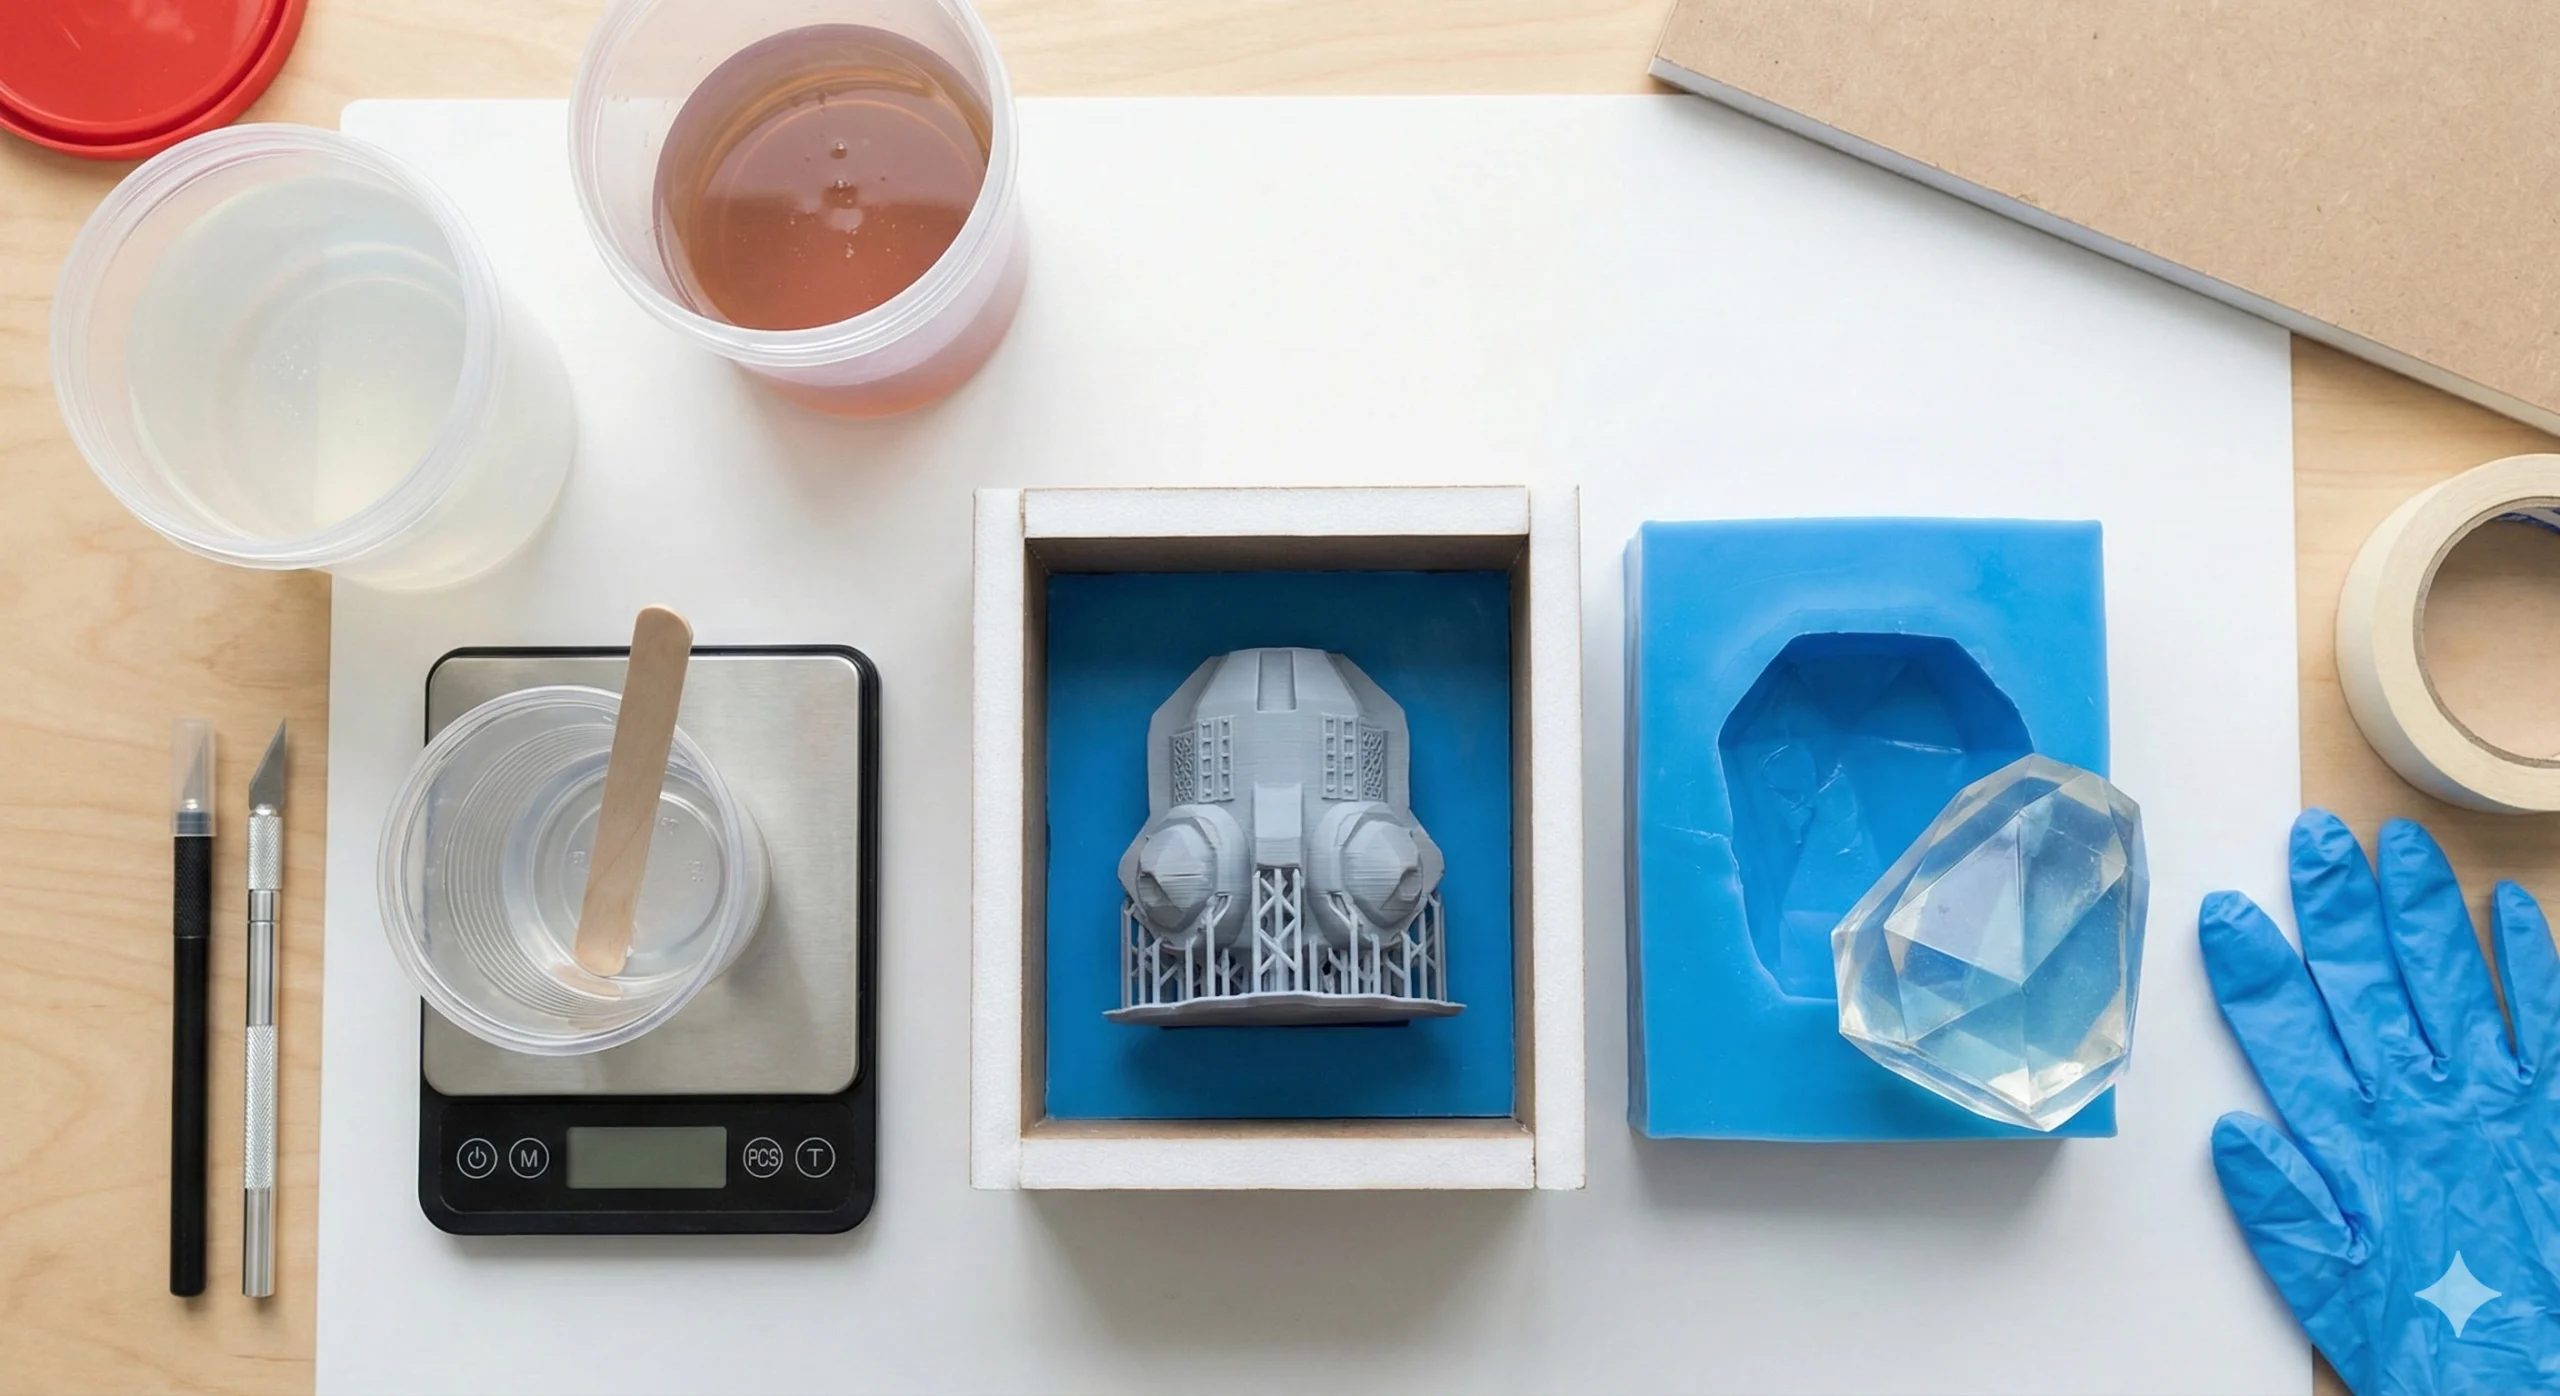
To make silicone molds, you must select a high-quality liquid silicone rubber, prepare a master model within a sealed housing, and pour the mixture carefully to avoid air entrapment. This process allows you to turn unique objects into repeatable templates for resin casting, candle making, or prototyping.
You might have a brilliant design in your head or a perfectly 3D-printed master model, but you are stuck because commercial molds don’t fit your specific dimensions. This limitation often leads to frustration, forcing you to settle for generic shapes that lack the professional edge your project deserves. By mastering how to make silicone molds, you gain the creative freedom to reproduce intricate details and complex geometries that standard retail options simply cannot offer.
Which items are necessary to make a silicone mold?
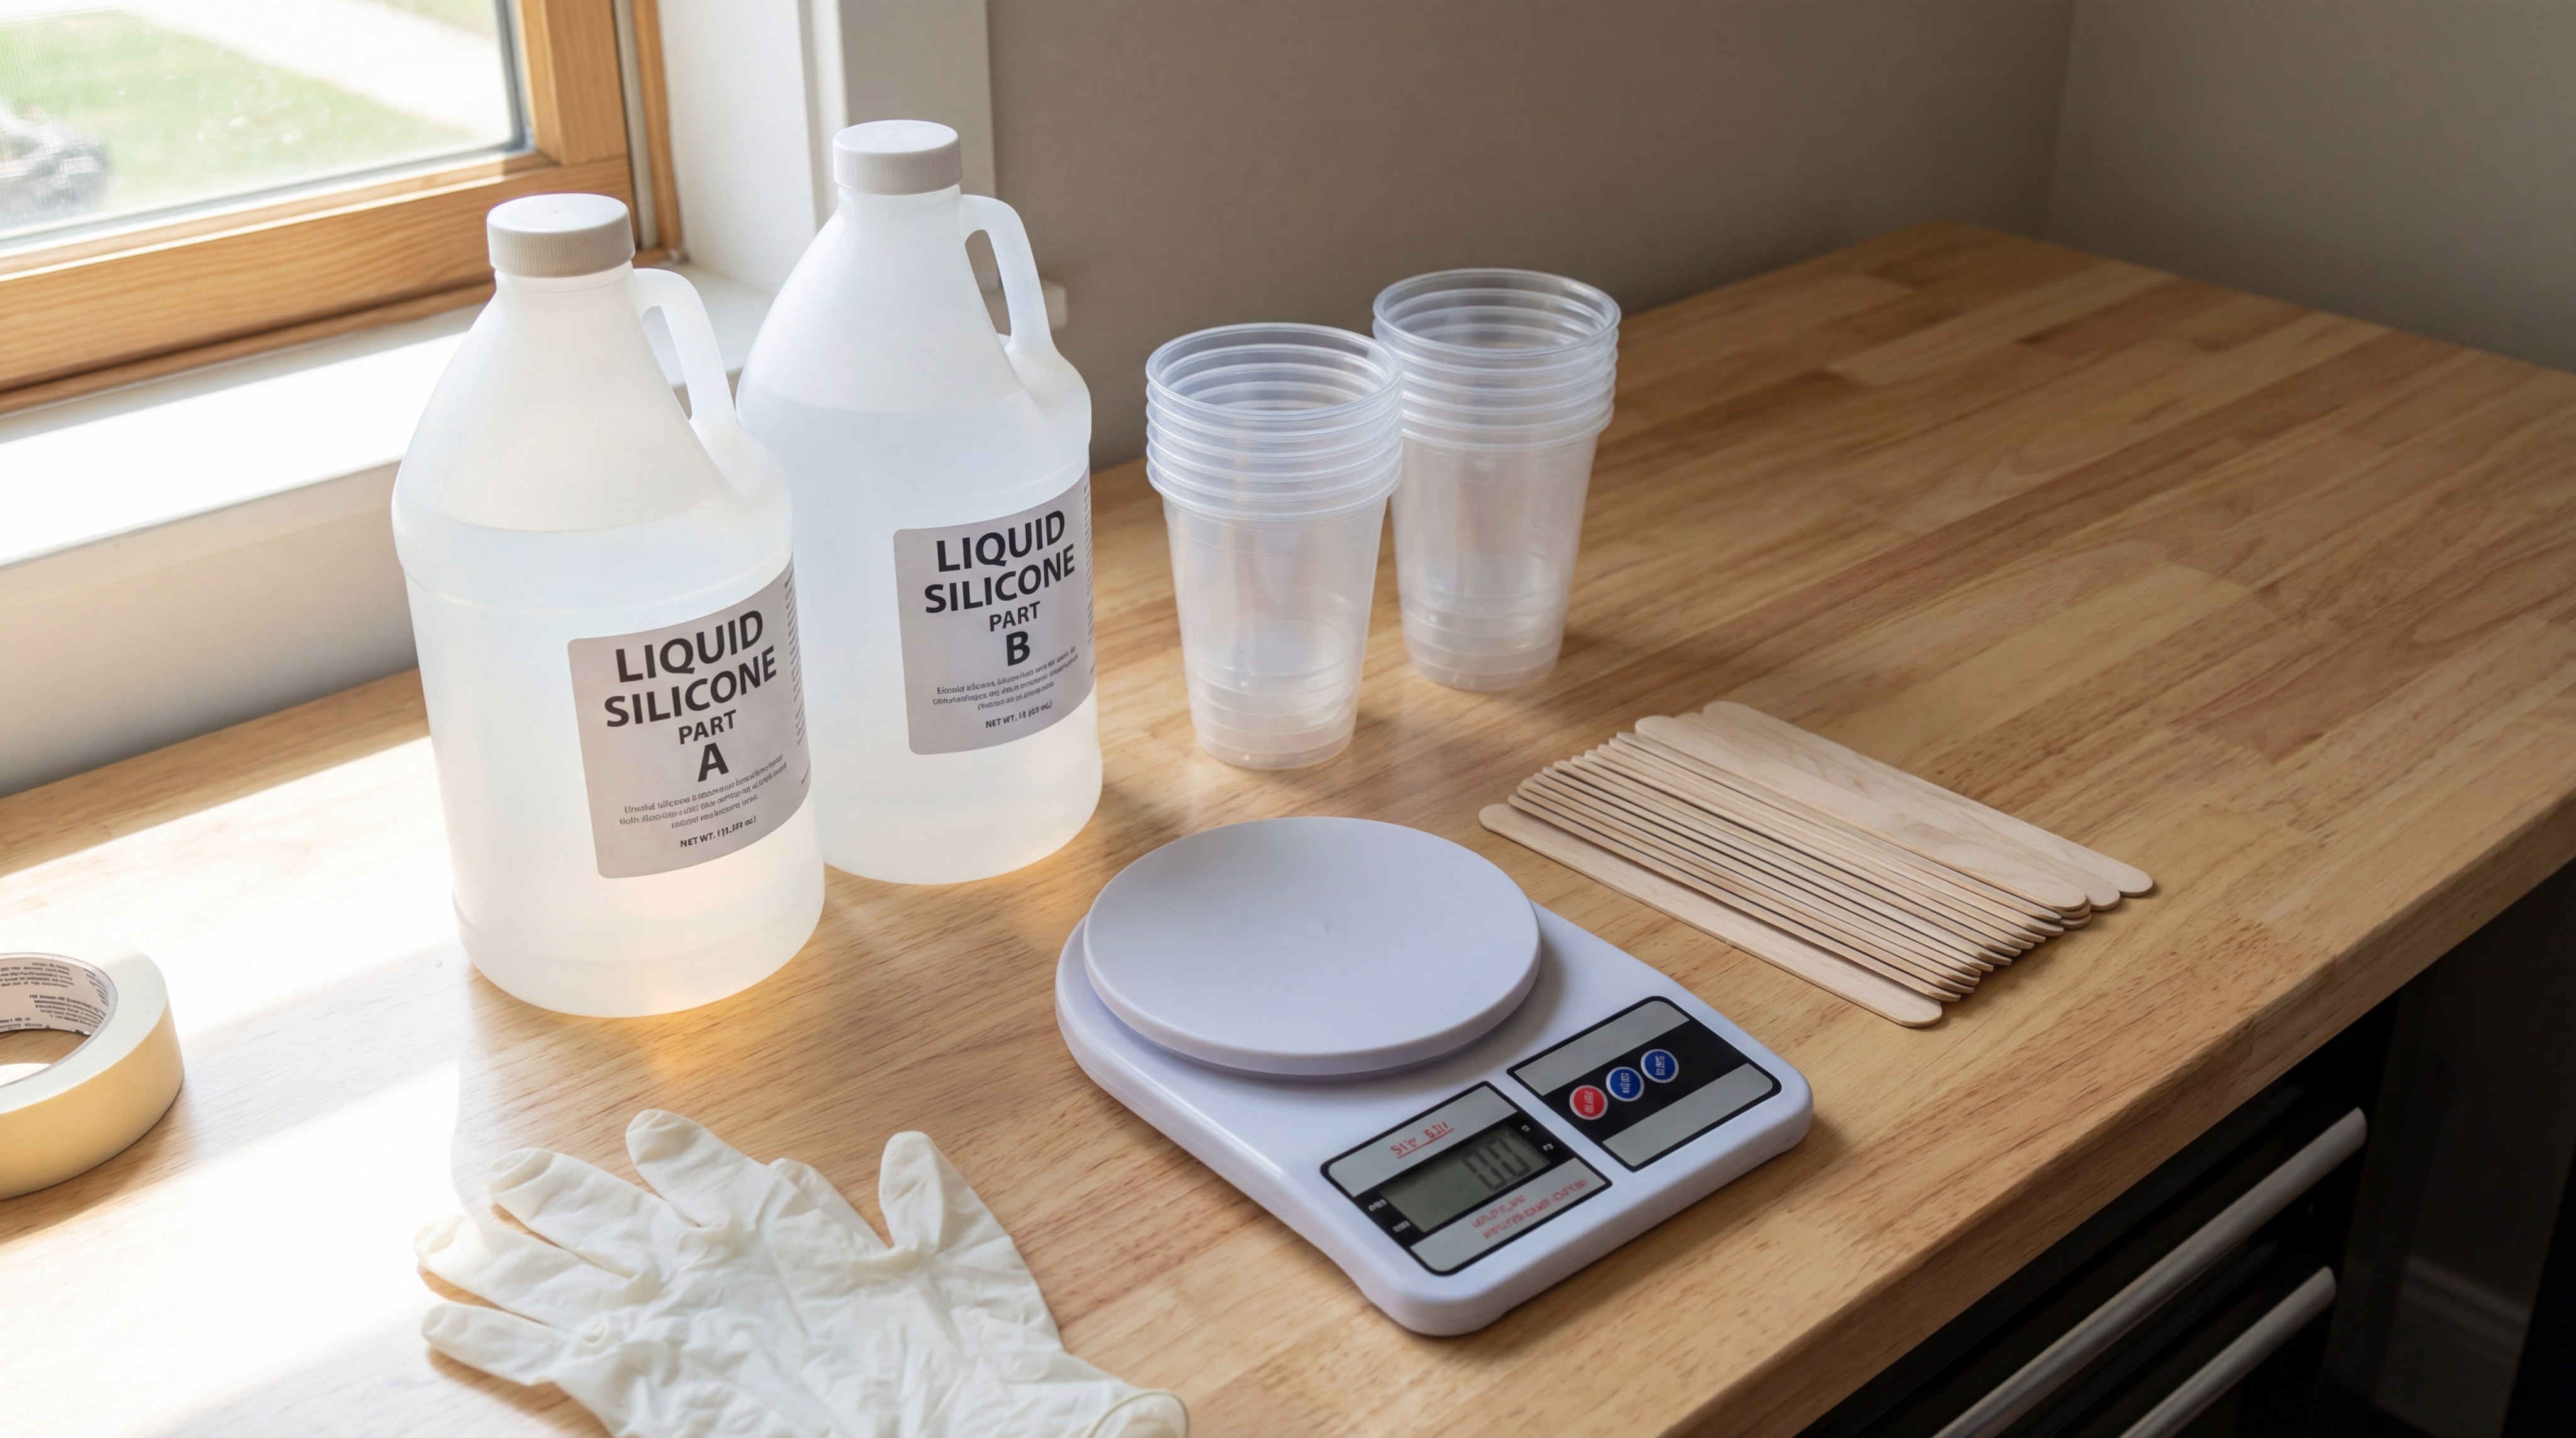
The essential items include RTV-2 liquid silicone, a catalyst, digital scales, mixing containers, and a sturdy master model. Learning how to make silicone molds starts with a clean workbench equipped with precision tools to ensure accurate mixing ratios.
Having the right supplies prevents chemical failures and ensures your mold lasts for hundreds of casts. Always keep nitrile gloves and safety glasses nearby to protect yourself during the chemical reaction phase.
What are the primary liquids?
You need to understand the chemistry before you pour.
- Liquid silicone base (Part A)
- Catalyst or curing agent (Part B)
- Silicone thinner (optional for lower viscosity)
Which tools assist in measuring?
Accuracy is the difference between a cured mold and a sticky mess.
- Digital gram scale for precise ratios
- Disposable mixing cups with graduated markings
- Flat-edged stir sticks to scrape the container walls
How to ensure a clean mix?
Let’s talk about the mixing process.
- Use a “double mix” method by transferring to a second cup.
- Scrape the bottom and sides thoroughly.
- Avoid introducing excessive air with rapid stirring.
Key Takeaway: Using a digital scale rather than measuring by volume ensures the chemical bond reaches maximum strength.
| Item | Purpose | Necessity |
|---|---|---|
| RTV-2 Silicone | Creating the flexible mold body | Mandatory |
| Digital Scale | Ensuring correct Part A:B ratio | High |
| Stir Sticks | Homogenizing the mixture | Mandatory |
This equipment list forms the backbone of any successful DIY molding setup, ensuring consistency across every batch.
How do you prepare a 3D model for molding?
You prepare a model by cleaning its surface, sealing any pores, and mounting it securely to the base of your mold box. When exploring how to make silicone molds, the surface finish of your master model dictates the quality of every future resin cast.
A rough or dirty model will transfer every imperfection to the silicone. If you are using 3D prints, ensure all layer lines are sanded or coated with a primer to prevent the silicone from gripping into the plastic ridges.
How to clean the master model?
Don’t let dust ruin your detail.
- Wipe with Isopropyl Alcohol (IPA) to remove oils.
- Use a soft-bristled brush for deep crevices.
- Use compressed air to blow out lint.
Is a release agent necessary?
Here is the secret to easy demolding.
- Apply a thin, even layer of universal mold release.
- Buff away excess to prevent “puddling” in details.
- Allow the agent to dry completely before pouring silicone.
Key Takeaway: A perfectly smooth and sealed master model reduces the risk of the silicone bonding permanently to your part.
| Prep Step | Action | Benefit |
|---|---|---|
| Sanding | Removing layer lines | Smooth surface |
| Priming | Sealing porous materials | Prevents cure inhibition |
| Mounting | Gluing to the base | Prevents model floating |
Properly prepped models ensure that the silicone captures every micro-detail without sticking or tearing during the first removal.
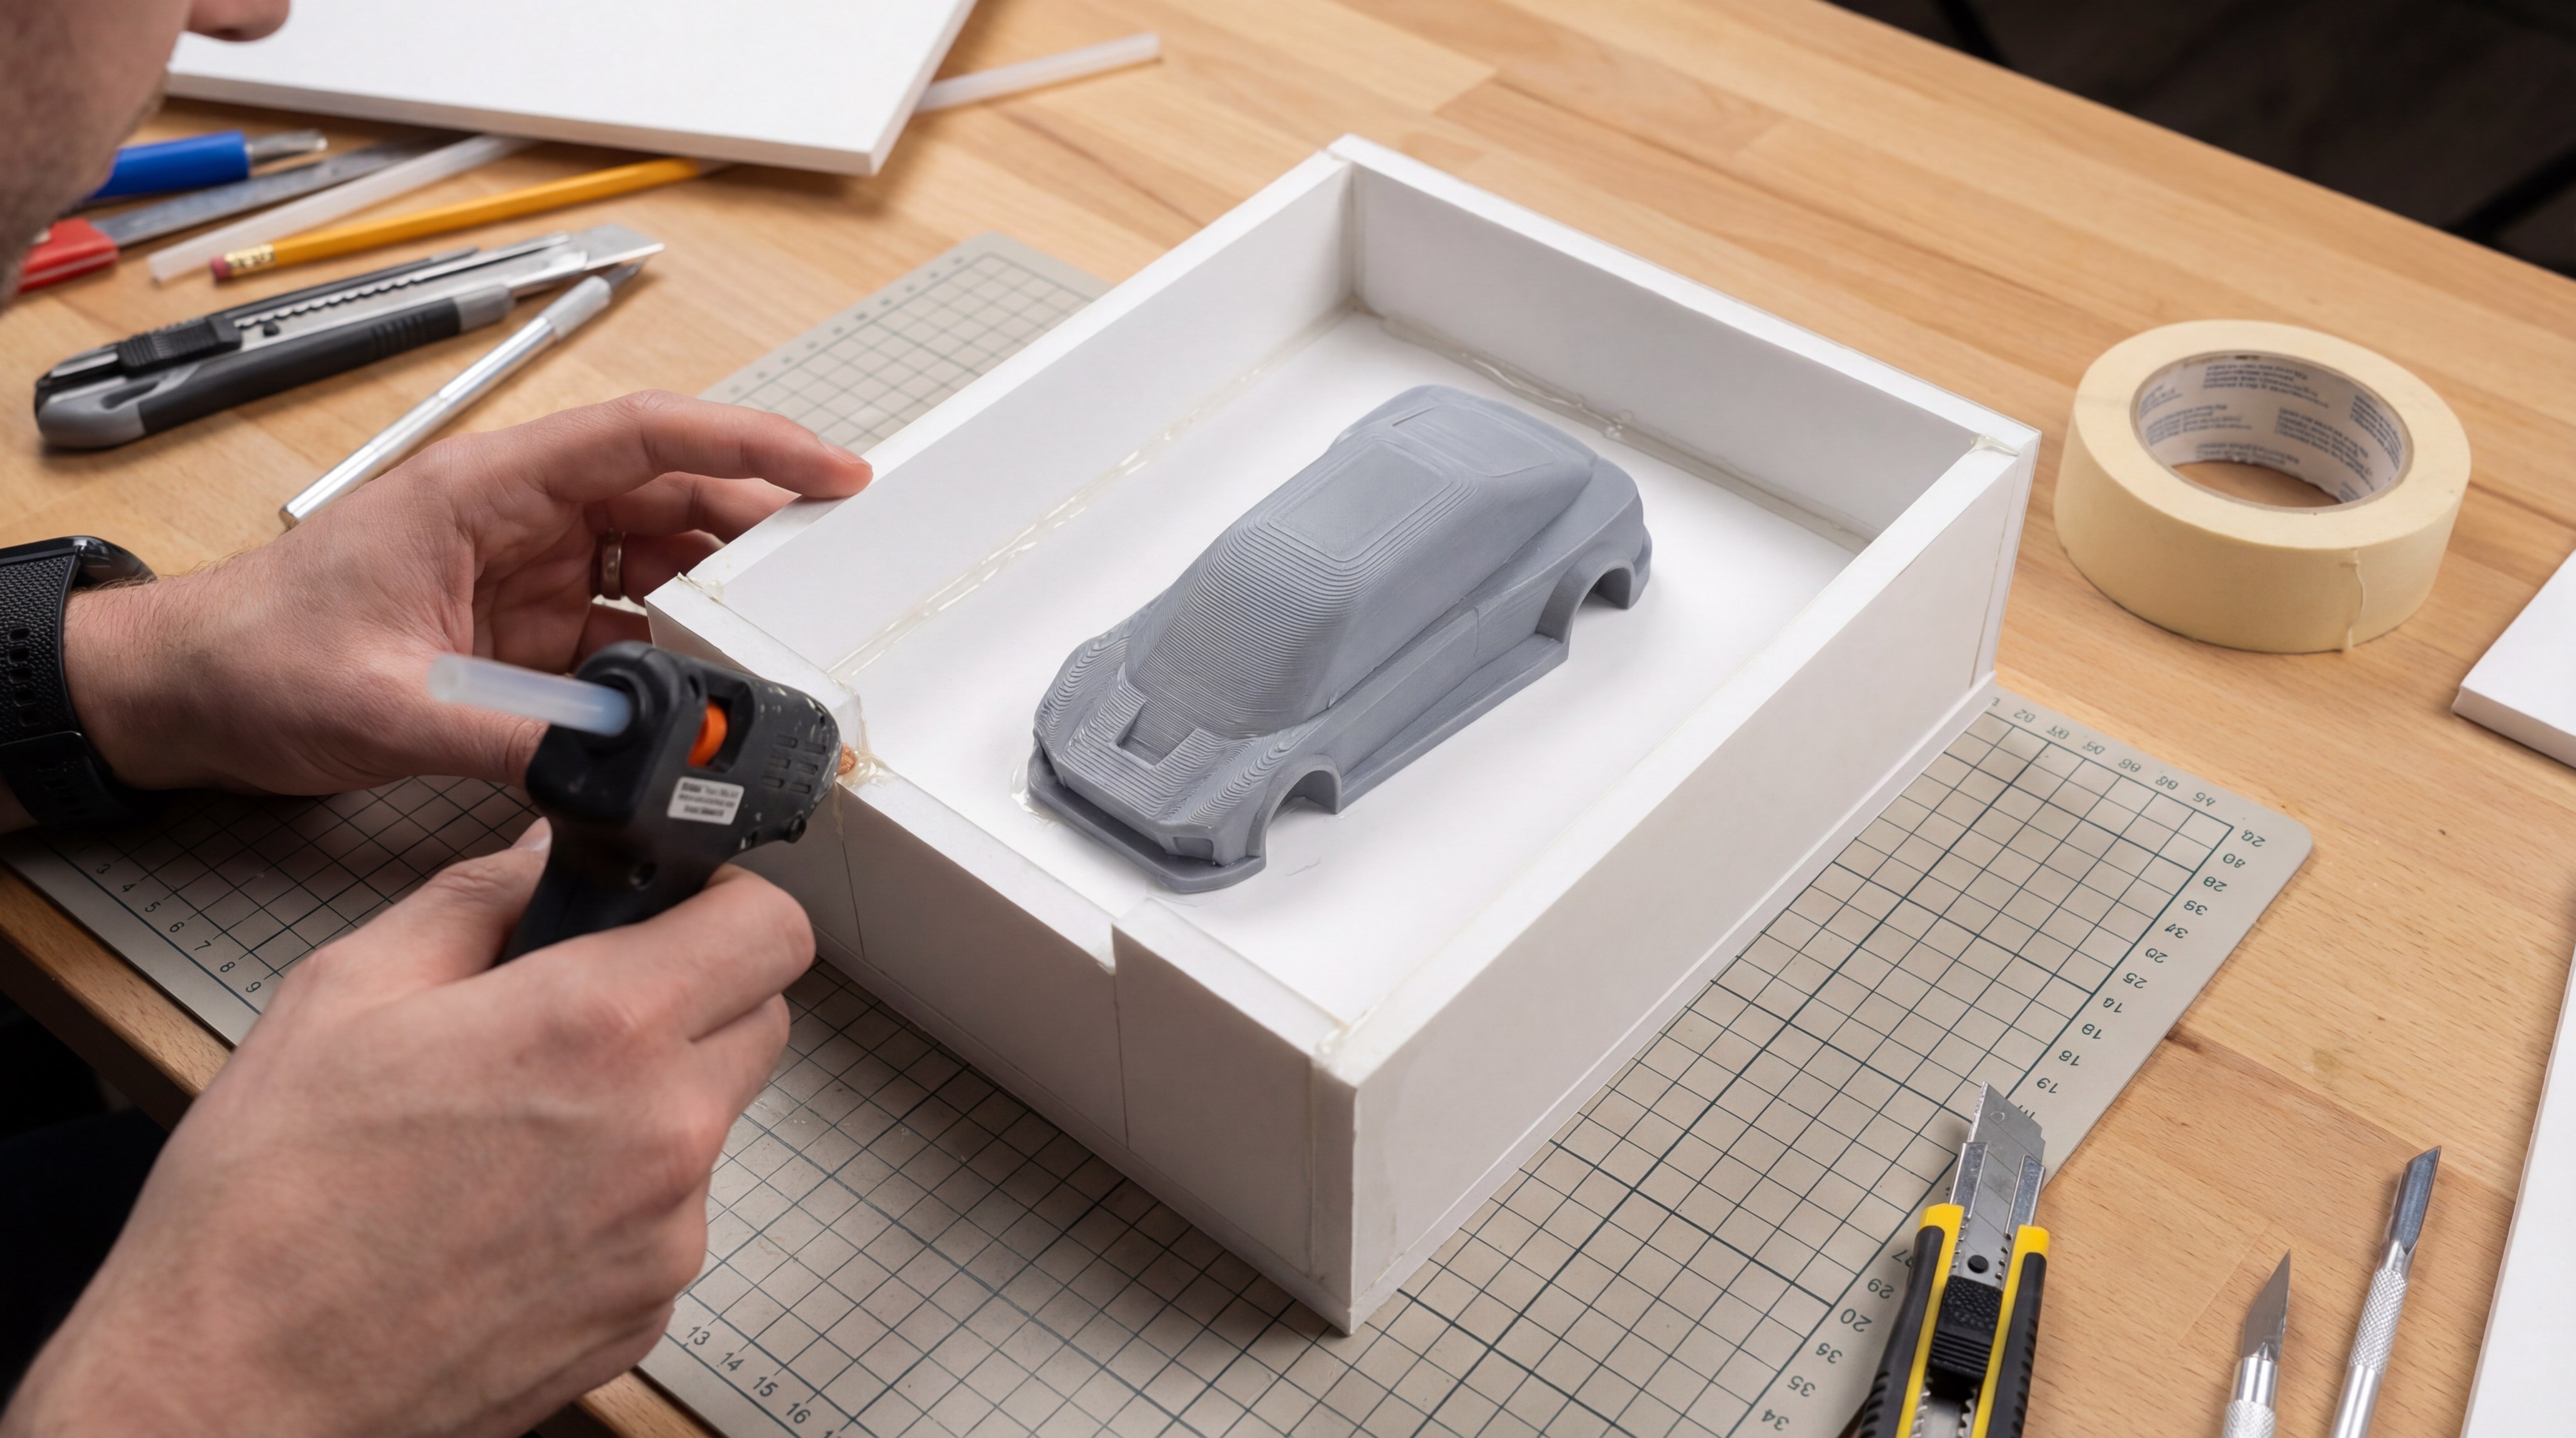
What is needed to make a silicone mold housing?
You need a rigid, non-porous box made of foam board, acrylic, or plastic that is at least half an inch larger than your model on all sides. Mastering how to make silicone molds requires a leak-proof housing that can withstand the weight of the liquid rubber during the cure.
Use hot glue to seal every external seam of the box to prevent the silicone from escaping. A single small gap can lead to a massive mess and wasted material, so double-check your seals before the pour.
Which materials work best for the box?
Stick to materials that silicone won’t bond to.
- Smooth foam board for easy cutting
- Acrylic sheets for visibility during the pour
- Plastic containers for simple geometric shapes
How to secure the model?
You don’t want your model to float away.
- Use a small dab of hot glue on the model base.
- Press firmly to the center of the housing.
- Ensure there is enough “wall thickness” for the mold.
Key Takeaway: Rigid walls prevent the mold from bulging, which ensures your final resin parts are dimensionally accurate.
| Housing Material | Pros | Cons |
|---|---|---|
| Foam Board | Cheap and accessible | One-time use |
| Acrylic | Transparent and reusable | Expensive |
| LEGO Bricks | Adjustable size | Hard to clean |
A well-constructed mold box is the only way to guarantee a professional, block-shaped mold that sits flat on your workbench.
What are the differences between silicone types?
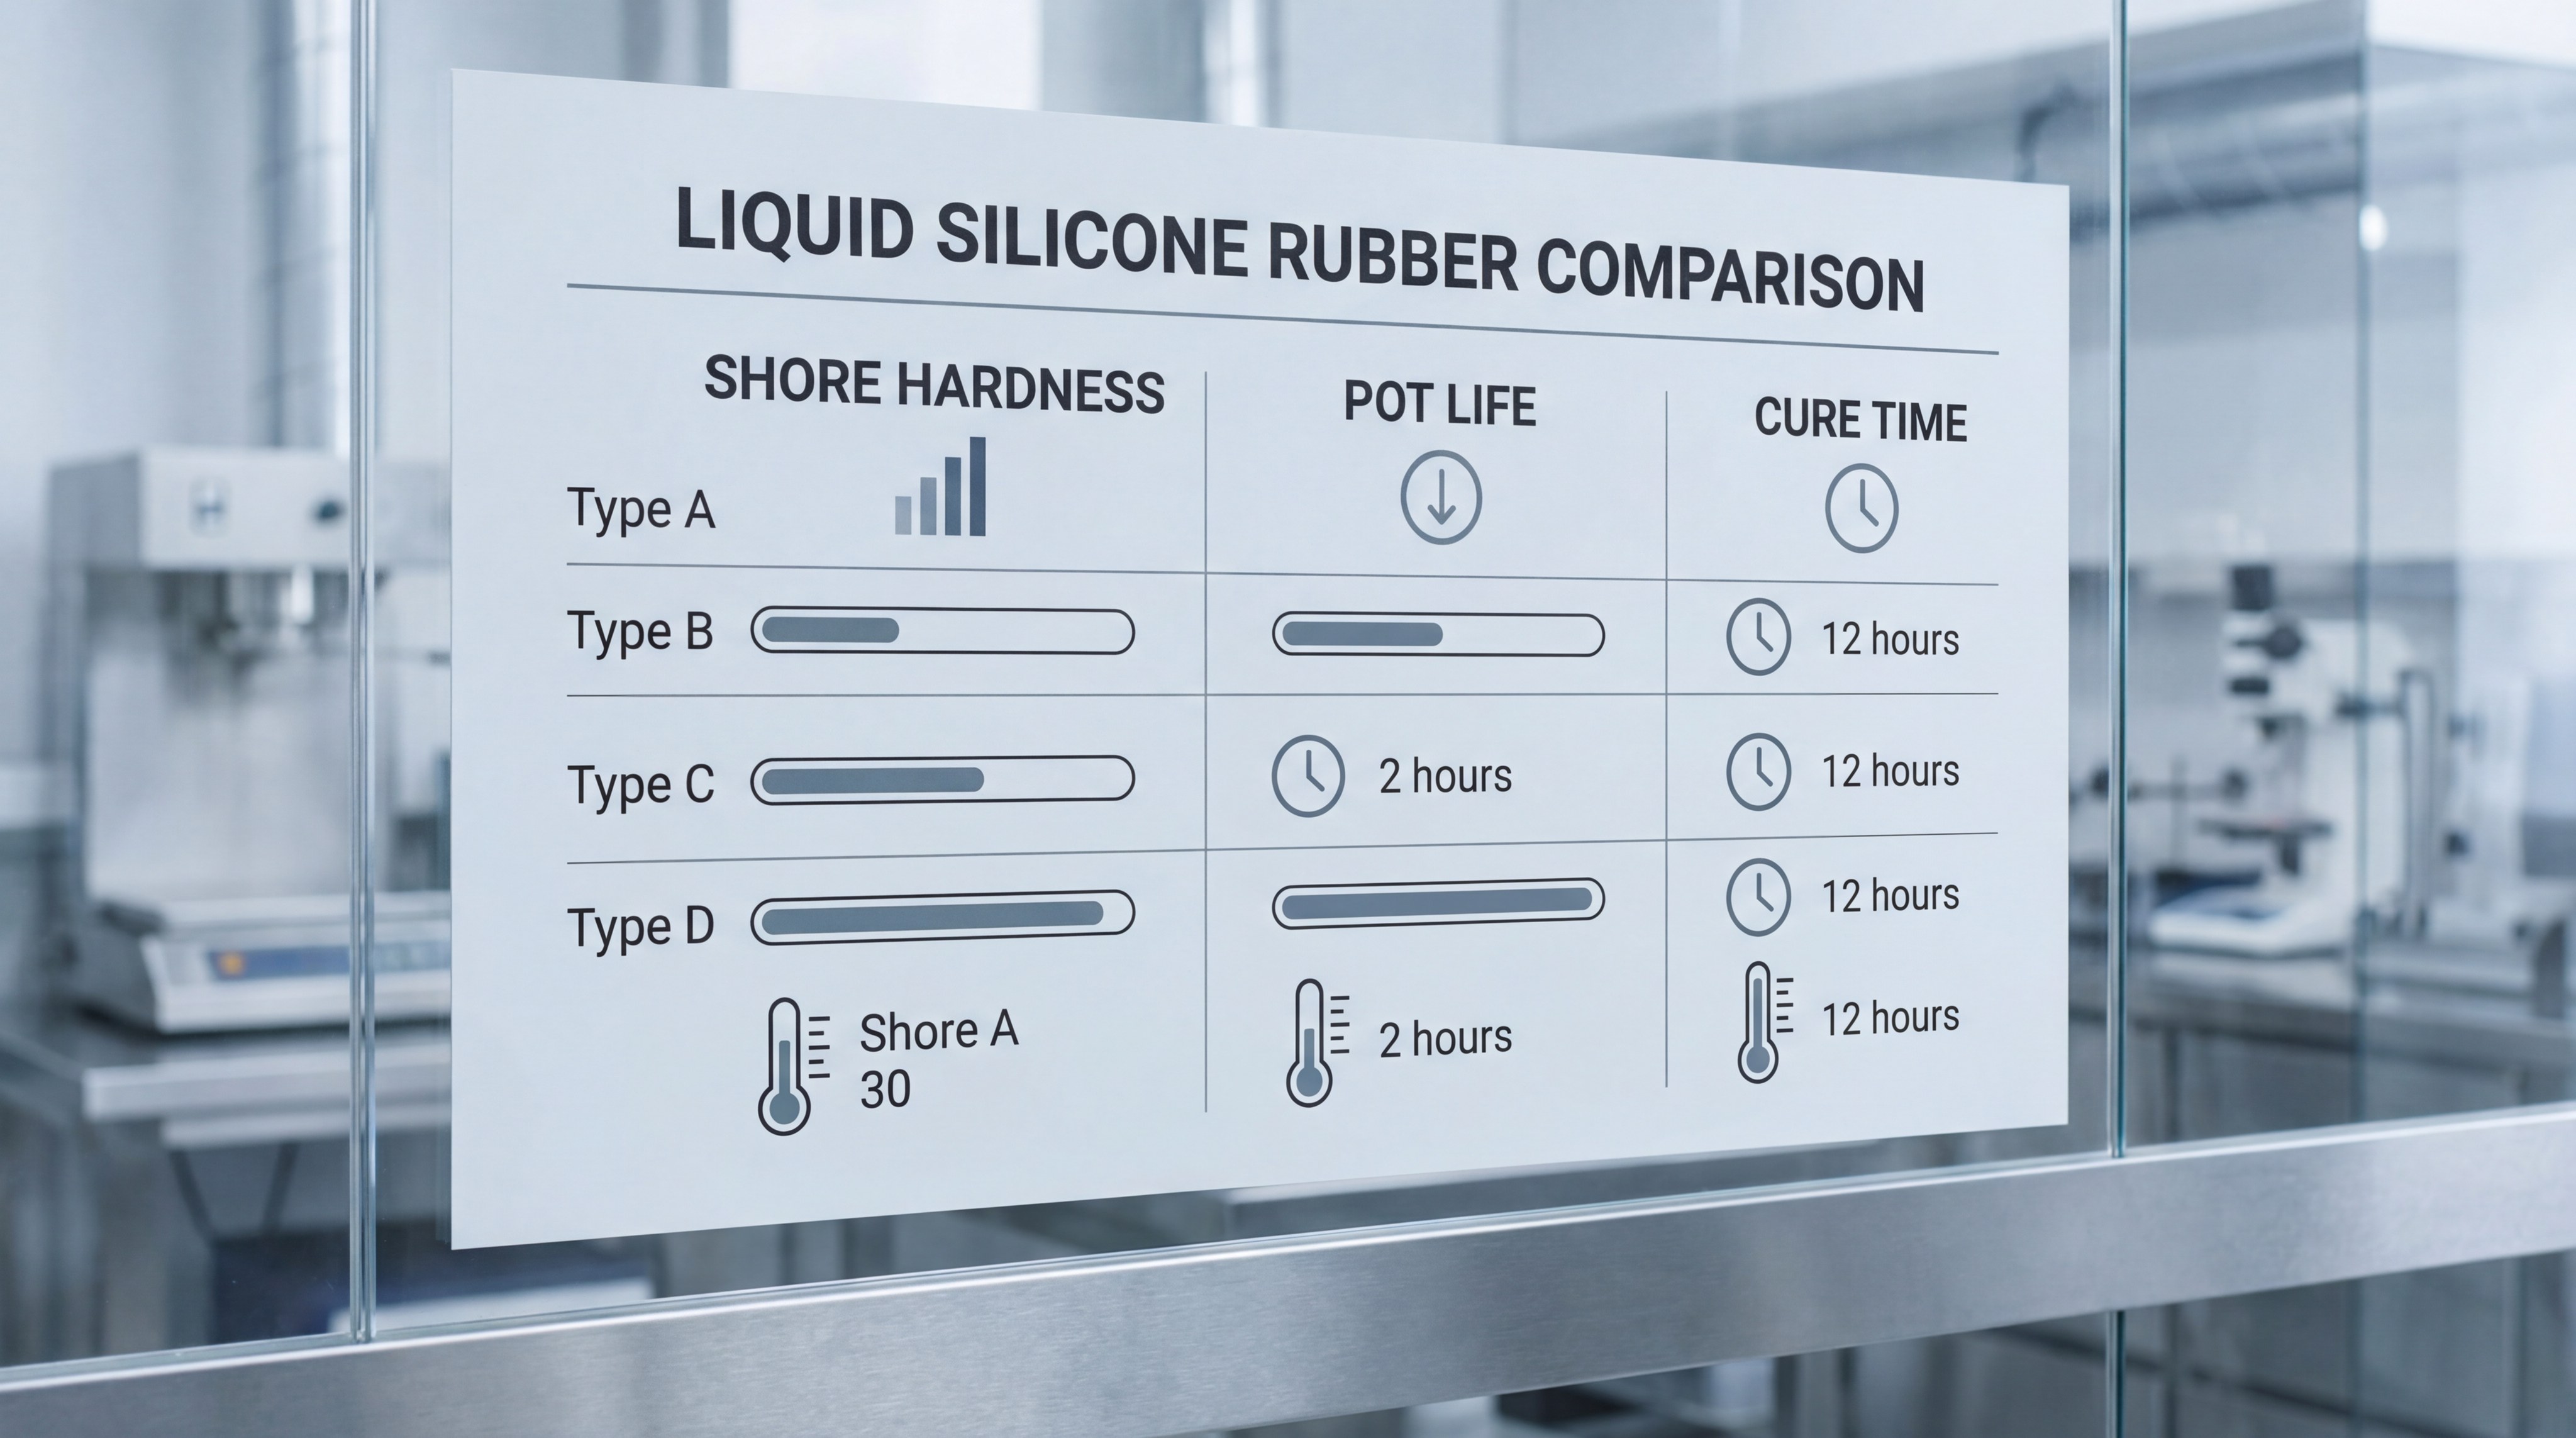
Silicone types differ primarily in their Shore hardness, viscosity, and chemical cure system (Tin vs. Platinum). Choosing how to make silicone molds efficiently depends on selecting a material that can capture your model’s detail while remaining flexible enough for demolding.
Platinum-cure silicones offer the best dimensional stability and long-term durability but are sensitive to cure inhibition. Tin-cure silicones are more forgiving for beginners and work well with a wider variety of master model materials.
What is Shore Hardness?
Think of this as the “squishiness” factor.
- 10A to 20A: Very soft and stretchy for deep undercuts.
- 30A to 40A: Standard hardness for most resin projects.
- 50A+: Rigid molds for flat, industrial parts.
How does pot life affect your workflow?
Time is of the essence once you mix.
- 15-minute pot life: Requires fast pouring and no degassing.
- 60-minute pot life: Ideal for vacuum degassing and complex pours.
- Over 2 hours: Used for massive industrial molds.
Key Takeaway: Matching viscosity to your model’s complexity prevents air from getting trapped in deep, narrow crevices.
| Silicone Property | Target Range | Impact |
|---|---|---|
| Viscosity | 10,000 – 30,000 cps | Pourability |
| Shore Hardness | 30A | General Purpose |
| Cure Time | 12 – 24 Hours | Project Speed |
Using this technical data allows you to optimize your production cycle and select the right grade of liquid silicone rubber.
Why is vacuum degassing important for molds?
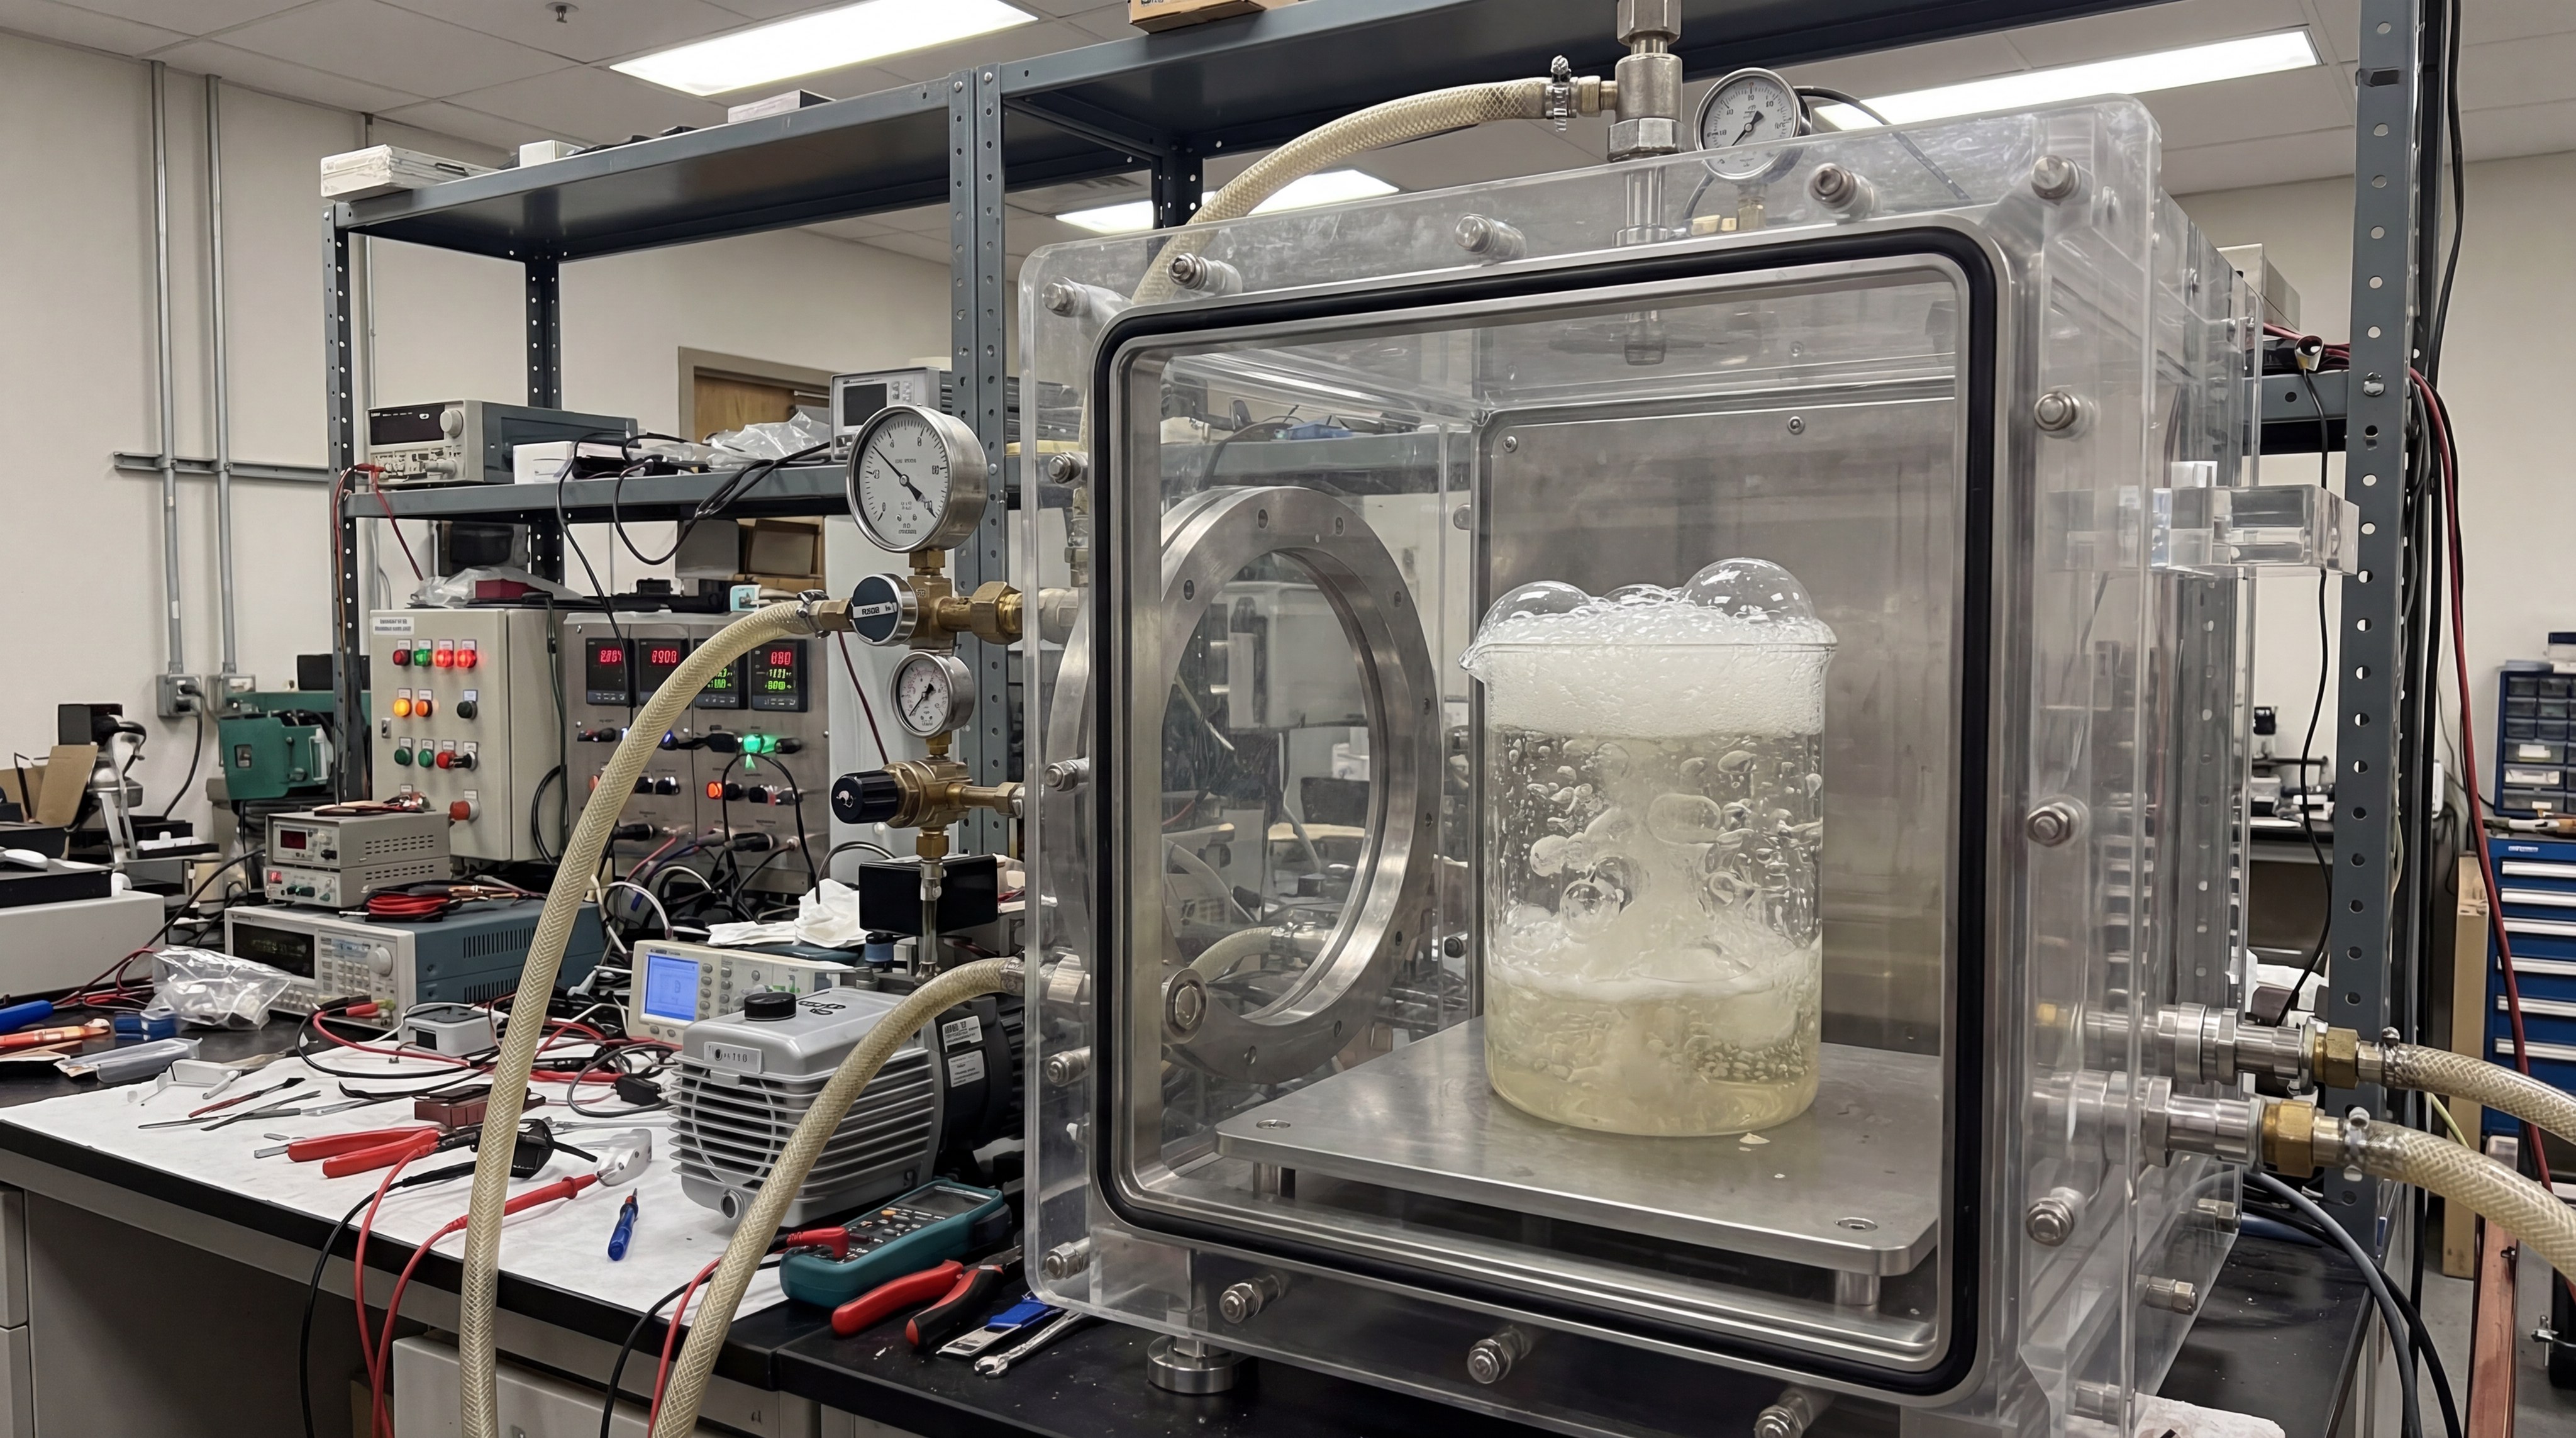
Vacuum degassing is important because it pulls microscopic air bubbles out of the silicone, ensuring the mold face is perfectly smooth. When researching how to make silicone molds for high-end retail products, removing air is the most critical step for professional results.
Bubbles trapped against the model surface will appear as circular bumps on your resin casts. A vacuum chamber forces these bubbles to expand and pop, leaving behind a dense, solid silicone mass.
How to use a vacuum chamber?
Don’t let the “muffin effect” surprise you.
- Place the mixed silicone in a container twice its volume.
- Turn on the pump and watch the silicone rise and fall.
- Hold the vacuum for 2 minutes after the fall to ensure clarity.
What if I don’t have a vacuum?
You can still minimize bubbles manually.
- Use a “high pour” technique from 2 feet above the box.
- Paint a thin layer of silicone onto the model first.
- Tap the sides of the mold box vigorously after pouring.
Key Takeaway: Degassing prevents structural weaknesses in the mold, significantly extending its production lifespan.
| Method | Effectiveness | Equipment |
|---|---|---|
| Vacuum Chamber | 99% Bubble Removal | Vacuum Pump |
| Pressure Pot | Compresses Bubbles | Air Compressor |
| Manual Tapping | 60% Bubble Removal | No equipment |
This stage of the process separates hobbyist results from industrial-quality molds capable of capturing fingerprint-level detail.
How do you pour silicone to avoid bubbles?
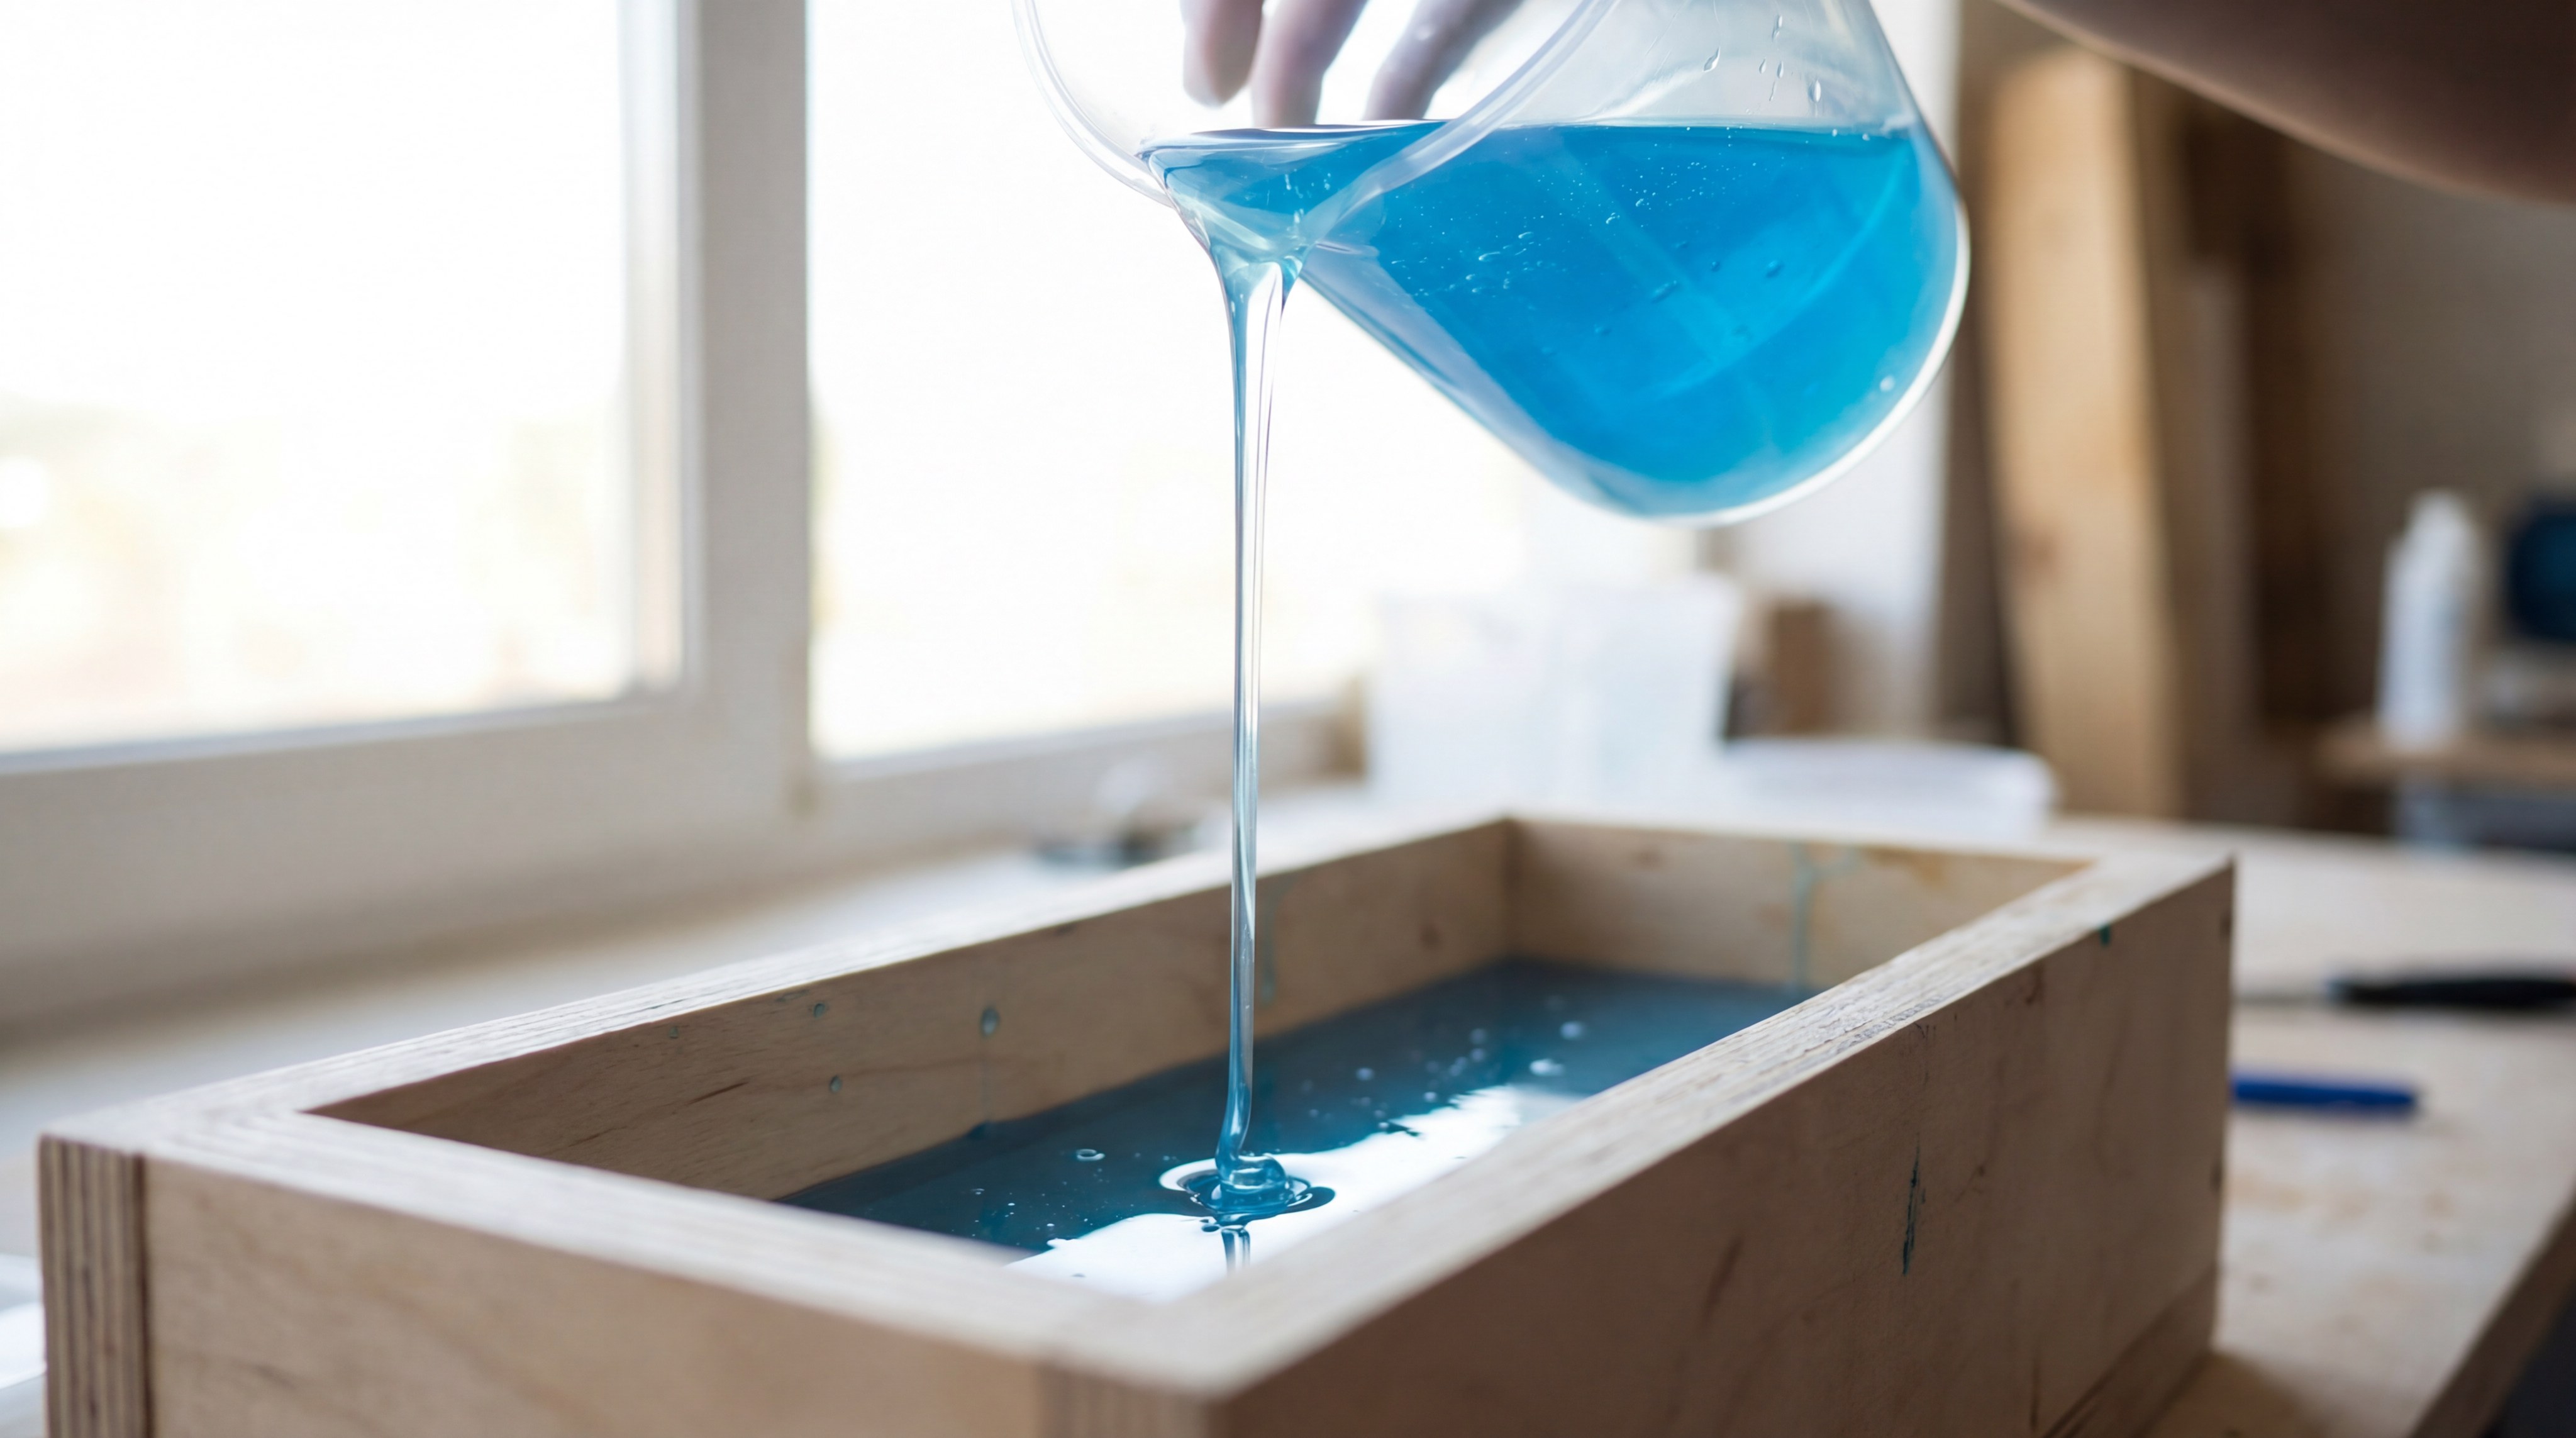
You should pour the silicone in a long, thin stream into the lowest point of the mold box, allowing it to rise naturally. This technique is a fundamental skill in how to make silicone molds because it stretches the air bubbles until they pop before hitting the model.
Never pour directly onto the center of the master model, as this can trap air pockets in undercuts. By letting the silicone flow over the part from the bottom up, the liquid displaces air as it climbs.
What is the target pour height?
Distance is your friend for bubble removal.
- Hold the mixing cup at least 18 to 24 inches high.
- Maintain a thin, needle-like stream of liquid.
- Move slowly to prevent splashing or turbulence.
How to handle complex undercuts?
Sometimes the liquid needs a little help.
- Tilt the mold box slightly during the initial pour.
- Use a toothpick to gently move silicone into deep holes.
- Avoid “waterfalling” over sharp edges too quickly.
Key Takeaway: A slow, steady pour into a single corner prevents air from becoming trapped between the model and the silicone.
| Pouring Rule | Action | Result |
|---|---|---|
| Single Point | Pour in one corner only | Uniform rise |
| Thin Stream | Stretch the liquid | Pops air bubbles |
| Overfill | Pour 0.5″ above model | Strong mold base |
Mastering the pour action ensures that the translucent blue or clear silicone settles perfectly against every surface of your master.
How do you mix resin for the final cast?
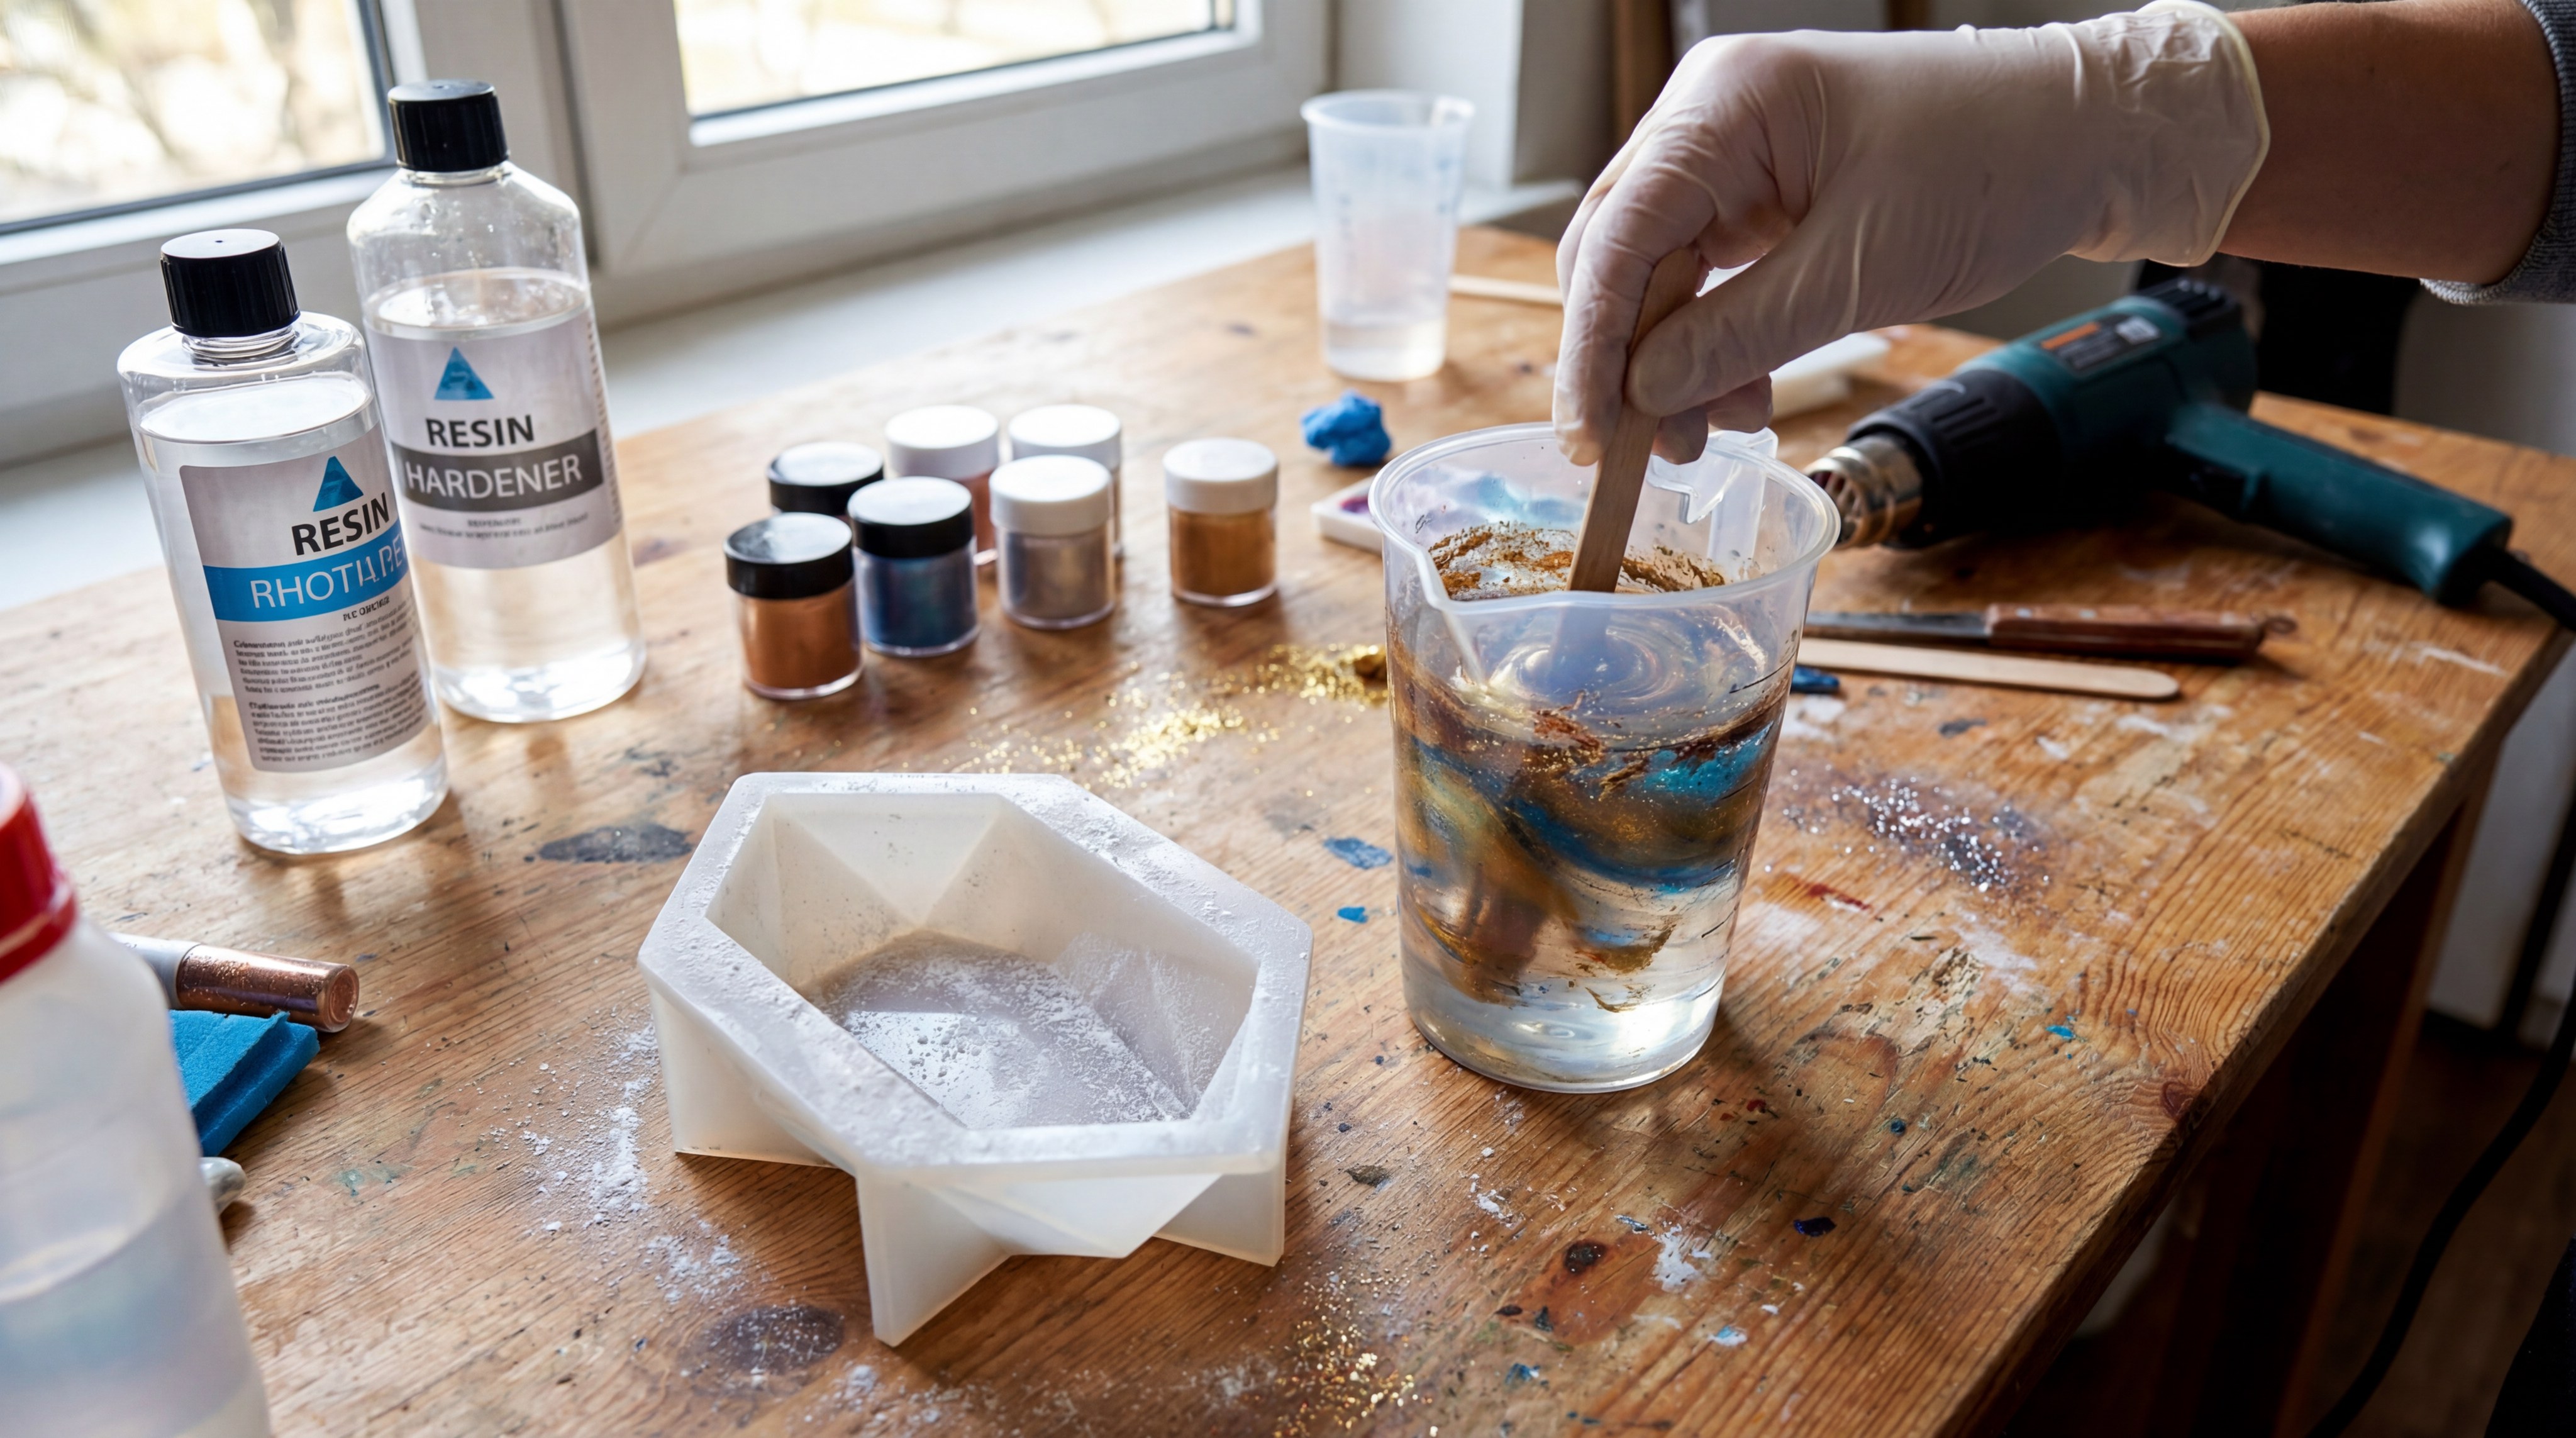
You mix resin by combining the resin and hardener in the exact ratio specified by the manufacturer, stirring slowly to minimize air. Once you have learned how to make silicone molds, the casting phase is where you add colors, glitters, or metallic pigments to your creation.
Always ensure your environment is at room temperature, as cold resin becomes thick and difficult to pour. Mix for at least three minutes, making sure to scrape the sides of your cup to avoid uncured “soft spots.”
How to add metallic pigments?
Make your resin stand out with effects.
- Add pigments after the resin and hardener are blended.
- Use a small amount; a little goes a long way.
- Stir in a swirling motion to create a “galaxy” effect.
What are common resin ratios?
Check your label before you start.
- 1:1 by volume (most common for craft resins)
- 2:1 by weight (common for industrial epoxies)
- High-performance urethanes often have 10:1 ratios.
Key Takeaway: Using a heat gun after pouring resin into the mold helps pop any surface bubbles that rose during the settling phase.
| Casting Step | Tool | Goal |
|---|---|---|
| Weighing | Digital Scale | Accurate cure |
| Pigmenting | Mica Powder | Aesthetic appeal |
| Pouring | Silicone Mold | Final part shape |
Perfecting the resin mix ensures that your final part is as durable and visually striking as the original master model.
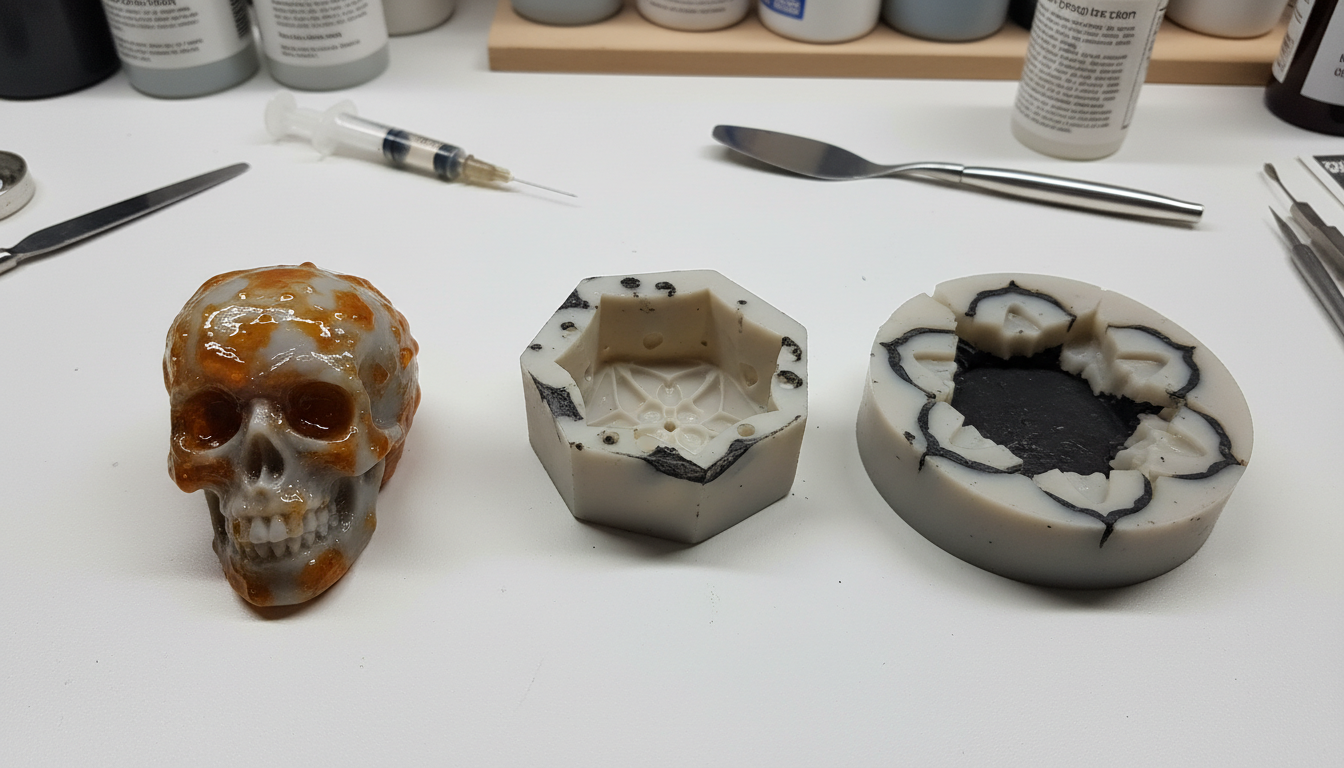
When is the best time to demold your part?
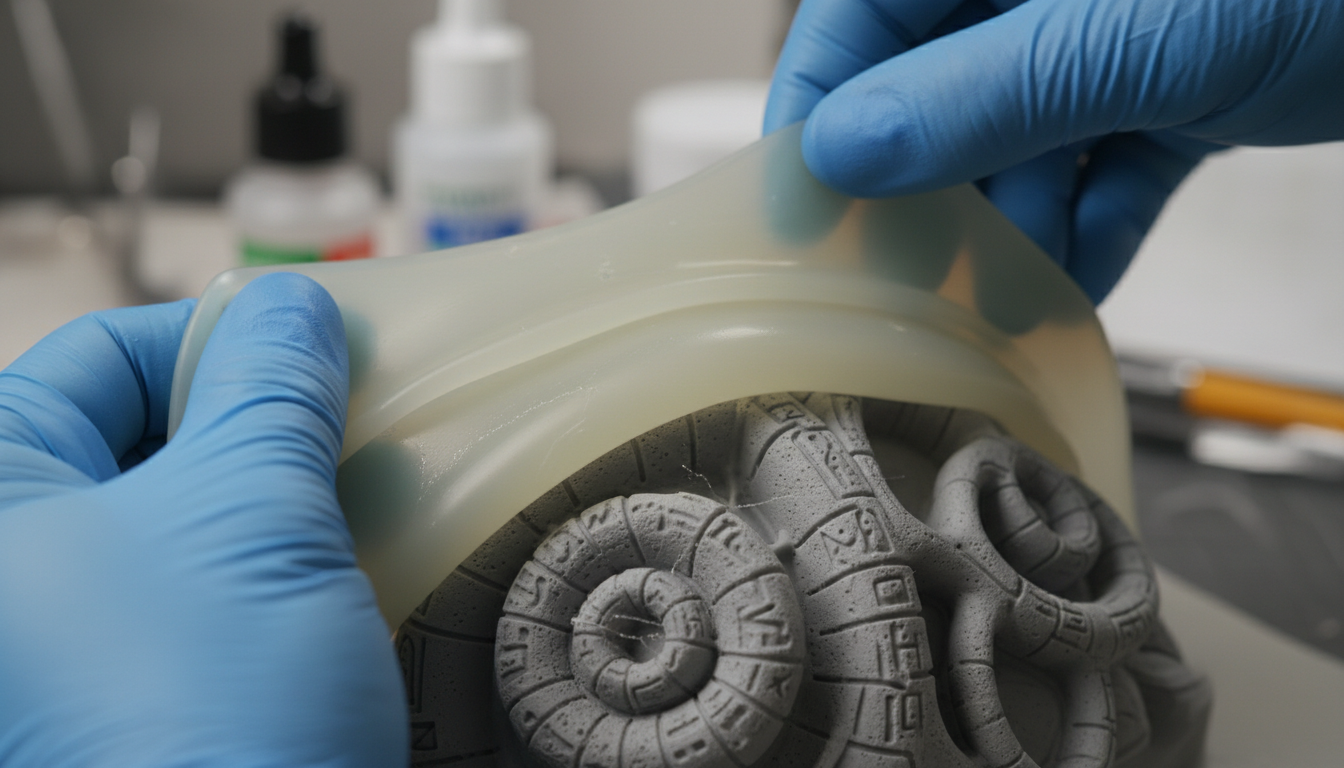
The best time to demold is when the silicone is no longer tacky and has reached its full Shore hardness, typically after 12 to 24 hours. Professionals specializing in how to make silicone molds recommend checking the “leftover” silicone in your mixing cup before touching the actual mold.
If the silicone in the cup is still soft or sticky, the mold inside the box is likely not ready. Pulling a mold too early can cause permanent deformation or tearing, especially around intricate details.
How to safely remove the housing?
Be gentle with your new tool.
- Remove the hot glue seams with a hobby knife.
- Peel away the foam board or acrylic walls carefully.
- Check the bottom of the mold for any leaks or thin spots.
What is the “peel” technique?
Don’t just rip it out.
- Slowly pull the silicone away from the edges of the model.
- Use a little soapy water as a lubricant if it’s stuck.
- Work your way around the part until it pops free.
Key Takeaway: Patience is the most important ingredient in demolding; rushing this step can ruin hours of preparation.
| Cure Indicator | Observation | Action |
|---|---|---|
| Tack-Free | Surface feels like rubber | Proceed to check |
| Shore Hardness | Resists fingernail pressure | Ready to demold |
| Leftovers | Fully cured in mixing cup | Safe to open |
Following these demolding steps ensures that your custom silicone mold remains intact and ready for its first resin pour.
Why did my silicone mold fail to cure?
Mold failure usually happens because of cure inhibition caused by contact with incompatible materials like sulfur, latex, or certain 3D printing resins. Troubleshooting how to make silicone molds often reveals that the silicone remained liquid or sticky where it touched the model.
If your mold has sticky spots, it cannot be fixed; you must clean the model and start over. To prevent this, always perform a small “patch test” on your master model before committing to a full pour.
What are the main inhibitors?
Keep these away from your platinum silicone.
- Sulfur-based modeling clays
- Natural latex gloves
- Uncured UV resin from 3D printers
How to fix a “sticky” model?
You need to neutralize the surface.
- Wash the part thoroughly in Isopropyl Alcohol.
- Coat the model with a high-quality acrylic sealer.
- Use a tin-cure silicone, which is less sensitive to inhibition.
Key Takeaway: Cure inhibition is a chemical reaction, not a drying issue; more time will not make a sticky mold cure.
| Failure Symptom | Likely Cause | Solution |
|---|---|---|
| Total Liquidity | Wrong mixing ratio | Re-measure by weight |
| Surface Stickiness | Cure inhibition | Seal the model surface |
| Air Pockets | No degassing or fast pour | Use vacuum chamber |
Understanding these failure modes allows you to avoid costly mistakes and material waste during your DIY projects.
How should you store your silicone molds?
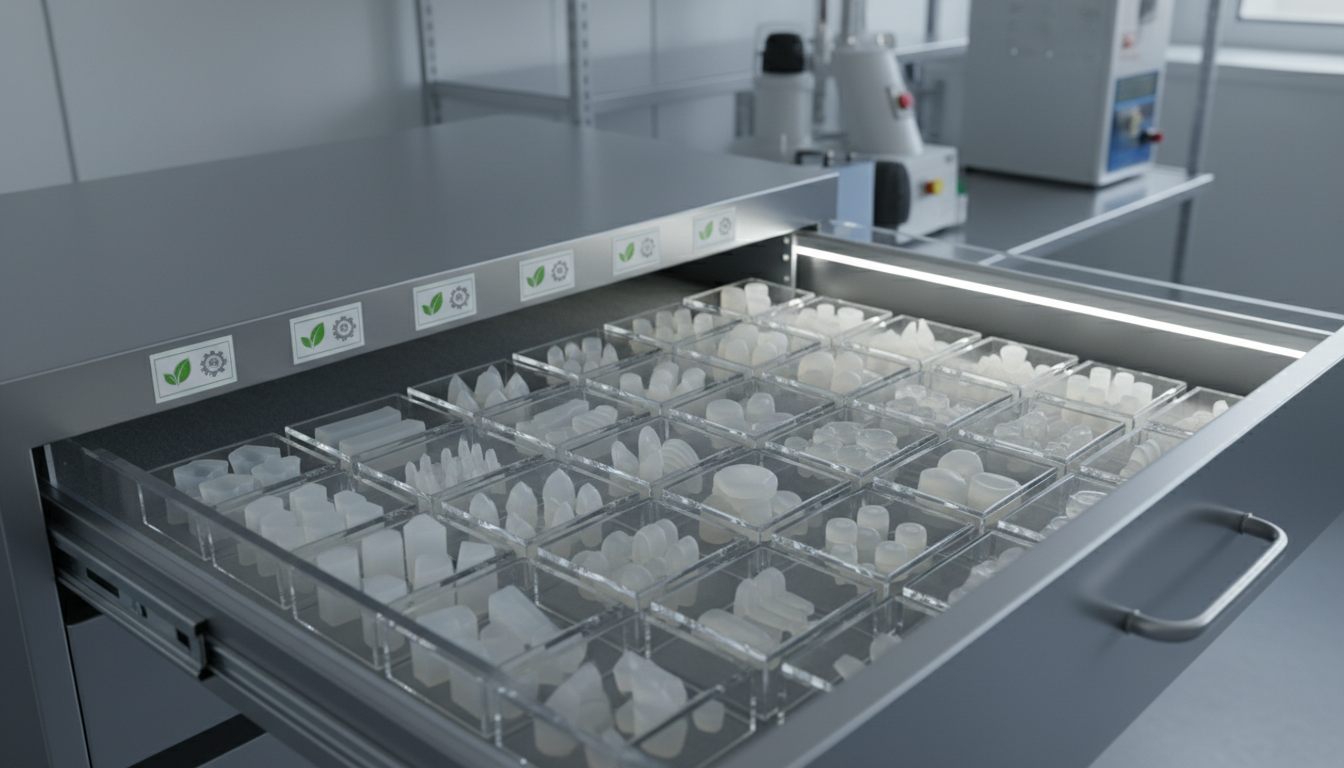
You should store your silicone molds lying flat in a cool, dark place to prevent them from warping or degrading over time. Long-term success with how to make silicone molds requires keeping them away from direct sunlight, which can make the silicone brittle.
Dust is the enemy of a clean resin cast, so always store your molds in airtight containers or zip-lock bags. If a mold is stored on its side, the weight of the silicone can cause it to permanently sag, ruining the symmetry of your future parts.
How to clean a mold before storage?
Maintenance keeps the detail sharp.
- Wash with warm, soapy water after every few uses.
- Use a piece of packing tape to lift away stubborn dust.
- Dry completely with compressed air to avoid water spots.
Is mold release needed for storage?
A light coat can help preserve the surface.
- Apply a thin layer of silicone-safe release agent.
- Wipe away excess so no residue remains.
- This prevents the mold from “sticking” to itself if folded.
Key Takeaway: Keeping molds in an organized, temperature-controlled drawer ensures they remain flexible for years of service.
| Storage Rule | Why It Matters | Result |
|---|---|---|
| Store Flat | Prevents sagging | Accurate parts |
| Dark Location | Prevents UV damage | Long mold life |
| Airtight Bag | Keeps dust away | Clean resin casts |
An organized storage setup is the final step in a professional DIY workflow, protecting your hard work and investment.
Conclusion
Creating your own silicone molds transforms you from a hobbyist into a custom manufacturer capable of producing professional-grade resin art, industrial prototypes, and bespoke gifts. We have solved the most common problems—from selecting the right RTV-2 silicone and building leak-proof housings to avoiding cure inhibition and bubble entrapment. Our vision is to provide every creator with the industrial-grade knowledge and high-quality materials needed to bring their most complex ideas to life with precision and ease.
If you are ready to take your production to the next level or need guidance on large-scale manufacturing solutions, please contact us today to speak with our technical experts.
Frequently Asked Questions (FAQs)
Can I use food-safe silicone for resin?
Yes, you can, but once you use a food-safe mold for resin, it is no longer safe for food use. Always keep your culinary and industrial molds completely separate to avoid cross-contamination.
What is the best way to remove bubbles?
The best way is using a vacuum chamber for degassing before pouring, followed by a pressure pot during the cure. If you lack this equipment, a “high pour” from 2 feet above the box is the most effective manual alternative.
Can I reuse a mold box?
What is the best way to do this? If you use acrylic or plastic containers and seal them with a release agent, they can be reused indefinitely. Foam board boxes are usually destroyed during demolding and must be rebuilt.
What is the best release agent for 3D prints?
A universal mold release spray like Mann Ease Release 200 is highly recommended for 3D printed masters. For porous prints, apply a clear acrylic sealer first to fill the microscopic holes before spraying the release agent.
How long does a silicone mold last?
A well-maintained mold can last between 50 and 200 resin casts depending on the complexity of the part and the type of resin used. Aggressive resins like fast-cast urethanes will degrade the silicone surface faster than slow-set epoxies.